Hi All,
Power
Platform has become
one the most set of tools that many organizations are leveraging. Power Platform has the robust power of Power
Apps, Power Automate and Power BI into one powerful business
application platform that helps citizen developers as well as pro developers in
providing quick and easy app building and data insights.
Microsoft Power Platform is low-code platform that spans Office 365, Azure, Dynamics 365, and standalone applications a shown below
Microsoft Power Platform is low-code platform that spans Office 365, Azure, Dynamics 365, and standalone applications a shown below
 |
Figure 1 Credit:
Microsoft
|
The
best thing about Microsoft
Power Platform is that is caters not only for citizen developers but also for professional
developers as shown:
Why needs an API in Power Platform?
Power Platform leverages Microsoft services to
connect to other services such as SharePoint, OneDrive as 3rd party services
such as MailChimp, Adobe Sign etc. What is an API?
API (Application Programming Interface) that allows two applications to talk to each other.
for e.g. A user initiates Power Apps (Application) to get a signature leveraging Adobe Sign, this will be the API call from Application (Power Apps) and Adobe Sign as a data source as shown below.
What is connector?
A connector is a wrapper around an API that allows the underlying service to talk to Power Automate and Power Apps.
A connector is a wrapper around an API that allows the underlying service to talk to Power Automate and Power Apps.
Type of connectors
You have 2 types of connectors.
1.
Public connectors (available to all)
2.
Custom connectors (built for your
organization)
Today we will build 2 simple custom connectors, one for Power
Automate and another for Power Apps.
A)
Weather API (with Power Automate)
For this API, you need to create an account so that you can use an API key.
·
Navigate
to Office.com
·
Go
to make.powerapps.com
·
Switch
to your environment where want to create custom connector. I use Power Apps
community plan which is suitable to development and NOT suitable to production
environment.
·
Read
through the https://aka.ms/powerappscommunityplan documentation or Use
this video how to get started with Power Apps Community Plan https://www.youtube.com/watch?v=VyrjpdVm_Ko
·
Power Apps >> Home >> Data >> Custom Connectors >> Create from blank
·
In
the General page fill the
details:
Icon colour: #007ee5
Description: Retrieve the weather by using http://api.weatherstack.com/
Scheme: Change to HTTP:
Host: api.weatherstack.com
Base URL: /
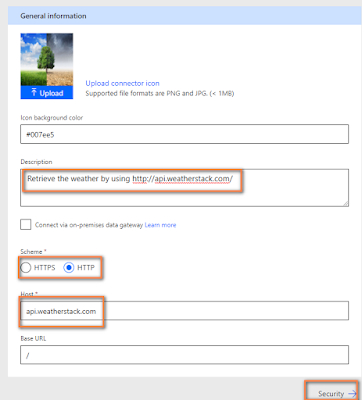
Icon colour: #007ee5
Description: Retrieve the weather by using http://api.weatherstack.com/
Scheme: Change to HTTP:
Host: api.weatherstack.com
Base URL: /

·
Click
Security to click on the next screen.
The authentication type should be API key.
Create an API key with key as Parameter label and
Parameter name as access key; switch the parameter location to Query as
illustrated:
Parameter label: key
Parameter name: access_key
Parameter label: key
Parameter name: access_key
Parameter location: Query
·
In
next step which is Definition and fill in the details:
Summary: Get weather
Description: Get weather in a specific city
Operation ID: GetWeather
The operation ID will be in our Power Automate flow.
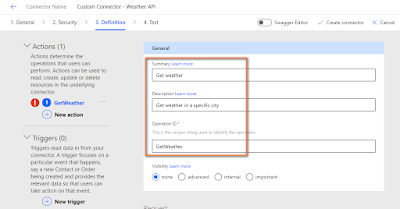
Summary: Get weather
Description: Get weather in a specific city
Operation ID: GetWeather
The operation ID will be in our Power Automate flow.

·
In
a new browser tab, type a weather request to make sure it works fine and
also to generate sample data that we will reuse in our connector
definition with the access_key and query parameter
Endpoint’s URL (Request):
http://api.weatherstack.com/current?access_key=2cb0533199c00cfc699963d7a0728881&query=Mumbai
Response (Output):
{"request":{"type":"City","query":"Mumbai, India","language":"en","unit":"m"},"location":{"name":"Mumbai","country":"India","region":"Maharashtra","lat":"18.975","lon":"72.826","timezone_id":"Asia\/Kolkata","localtime":"2020-07-19 16:28","localtime_epoch":1595176080,"utc_offset":"5.50"},"current":{"observation_time":"10:58 AM","temperature":31,"weather_code":143,"weather_icons":["https:\/\/assets.weatherstack.com\/images\/wsymbols01_png_64\/wsymbol_0006_mist.png"],"weather_descriptions":["Haze"],"wind_speed":22,"wind_degree":260,"wind_dir":"W","pressure":1004,"precip":2.1,"humidity":75,"cloudcover":75,"feelslike":39,"uv_index":6,"visibility":5,"is_day":"yes"}}
·
Within
the Definition page, locate Request section, click Import from
sample
·
We
need to get weather information for a City. We use Get Verb >> URL
Simply paste: http://api.weatherstack.com/current?access_key=2cb0533199c00cfc699963d7a0728881&query=Mumbai as shown.
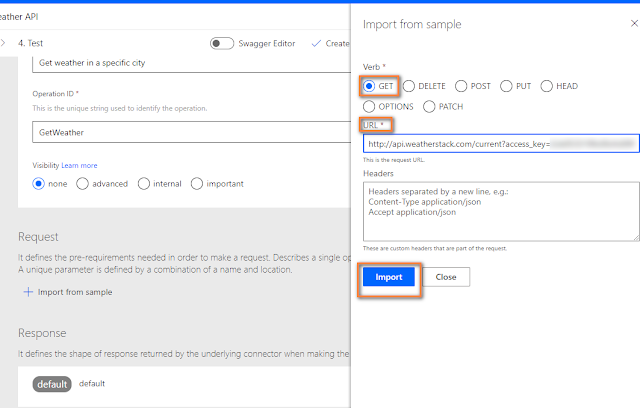
Simply paste: http://api.weatherstack.com/current?access_key=2cb0533199c00cfc699963d7a0728881&query=Mumbai as shown.

·
Click
on Edit on the query parameter
·
Enter
parameters details as shown below:
Name: query
Description: Fill in the city
Summary: City Name
Is Required: Yes
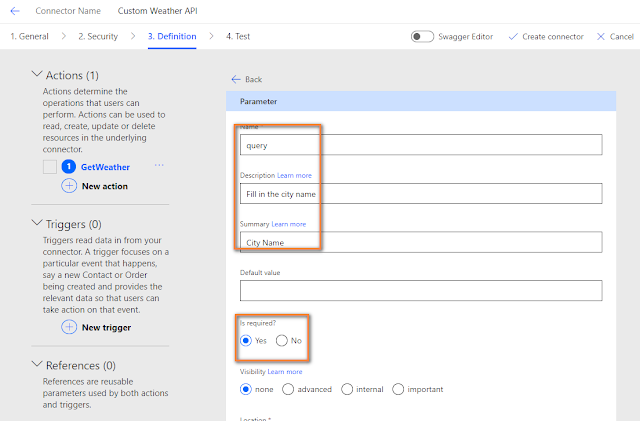
Name: query
Description: Fill in the city
Summary: City Name
Is Required: Yes

·
Copy
the Weather’s API JSON content.
{"request":{"type":"City","query":"Mumbai, India","language":"en","unit":"m"},"location":{"name":"Mumbai","country":"India","region":"Maharashtra","lat":"18.975","lon":"72.826","timezone_id":"Asia\/Kolkata","localtime":"2020-07-19 16:28","localtime_epoch":1595176080,"utc_offset":"5.50"},"current":{"observation_time":"10:58 AM","temperature":31,"weather_code":143,"weather_icons":["https:\/\/assets.weatherstack.com\/images\/wsymbols01_png_64\/wsymbol_0006_mist.png"],"weather_descriptions":["Haze"],"wind_speed":22,"wind_degree":260,"wind_dir":"W","pressure":1004,"precip":2.1,"humidity":75,"cloudcover":75,"feelslike":39,"uv_index":6,"visibility":5,"is_day":"yes"}}

{"request":{"type":"City","query":"Mumbai, India","language":"en","unit":"m"},"location":{"name":"Mumbai","country":"India","region":"Maharashtra","lat":"18.975","lon":"72.826","timezone_id":"Asia\/Kolkata","localtime":"2020-07-19 16:28","localtime_epoch":1595176080,"utc_offset":"5.50"},"current":{"observation_time":"10:58 AM","temperature":31,"weather_code":143,"weather_icons":["https:\/\/assets.weatherstack.com\/images\/wsymbols01_png_64\/wsymbol_0006_mist.png"],"weather_descriptions":["Haze"],"wind_speed":22,"wind_degree":260,"wind_dir":"W","pressure":1004,"precip":2.1,"humidity":75,"cloudcover":75,"feelslike":39,"uv_index":6,"visibility":5,"is_day":"yes"}}

·
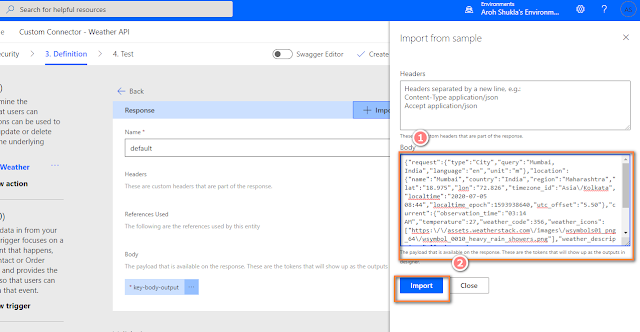
In
Power Automate’s Response windows, paste the content as Body from
Weather’s API JSON and click on Import.

·
Click
on Test.
·
Click
on New connection
·
Click
on Refresh
·
You
must have connected to this API within Connection section and type any city
name:
·
Results
will display all entries for that location.
·
Update Connector.
·
Test
the flow and check the results.
A)
Google Books (with Power Automate)
In this example we will get retrieve Books
information using Google Books API.
We will make small Books library app as shown.
We will make small Books library app as shown.
·
Power
Apps >> Home >> Data
>> Custom Connectors >>
Create from blank
·
Create
a custom connector, it as Google Books
API and click on Continue
·
In
the Definition in fills the details:
Upload custom image
Icon background: #007ee5
Description: Google API connection for getting volumes of book from the Internet.
Scheme: HTTPS
Host: www.googleapis.com
Base URL: /books/
Upload custom image
Icon background: #007ee5
Description: Google API connection for getting volumes of book from the Internet.
Scheme: HTTPS
Host: www.googleapis.com
Base URL: /books/
·
Verify
the Google Books API https://developers.google.com/books/docs/v1/using
We will perform a search for Google Book volumes with this end URL point https://www.googleapis.com/books/v1/volumes?q=search+terms
We will perform a search for Google Book volumes with this end URL point https://www.googleapis.com/books/v1/volumes?q=search+terms
· In
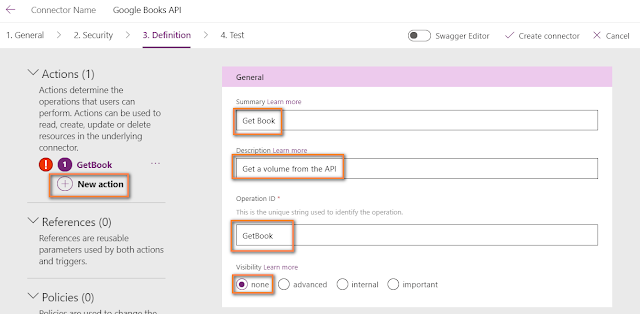
the Definition page, create a new action called as GetBook and
fill in details a follows
Summary: Get Book
Description: Get a volume from the API
Operation ID * GetBook
The Operation ID will be used in Power Apps
Description: Get a volume from the API
Operation ID * GetBook
The Operation ID will be used in Power Apps

·
Now,
got Google Books API, we have to make minor modifications so that we can use
for Endpoints for our custom connector Request and Response
portion.
·
In
Definition, go to REQUEST and click on Import from Sample , Use Get
Verb and type the URL endpoint https://www.googleapis.com/books/v1/volumes?q=search+terms and click on Import.
·
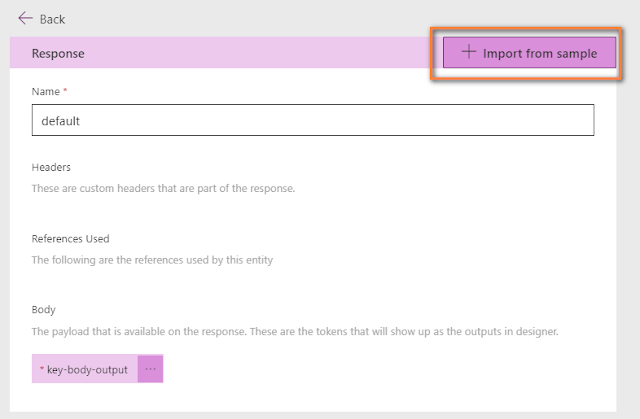
In
Definition, go to RESPONSE, click on Default

and click on Import from Sample ,
and paste the JSON payload
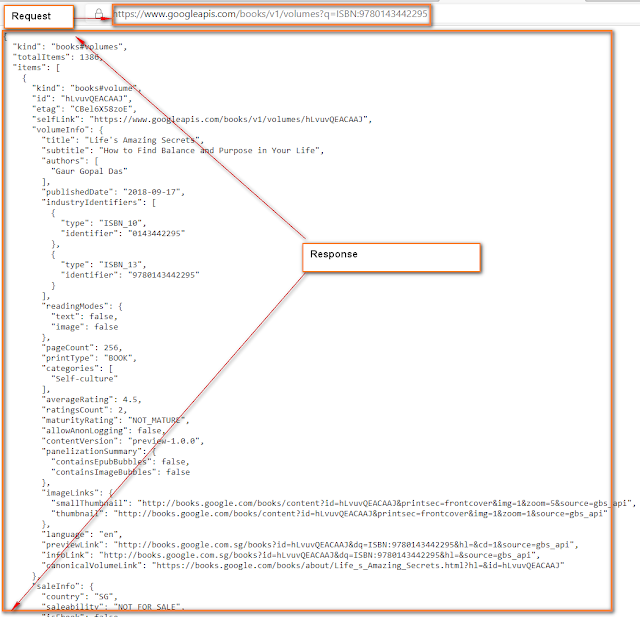
to Body and click on Import.


and click on Import from Sample ,

and paste the JSON payload

to Body and click on Import.

·
Click
on Validation link to proceed.
·
Click
on Create prompt.
·
Next,
click on Connections
·
We
get 200 response and check if we get correct details.
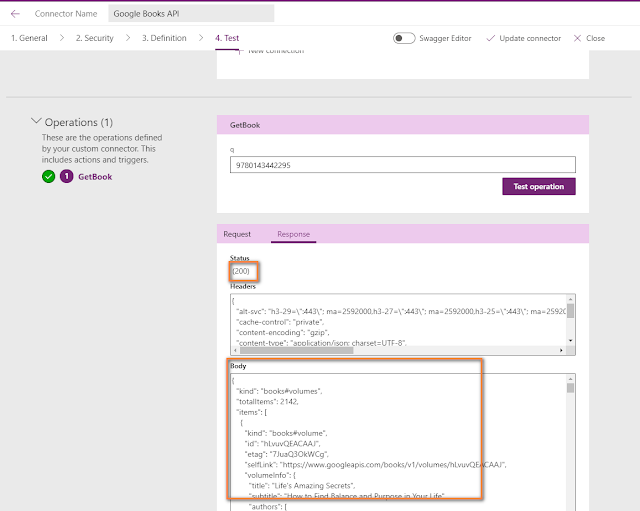
NOTE: Please note creating a custom connector takes time and we you rush you might get 404 error. Please be patient and wait for 2-3 minutes once custom connector and then test operation

NOTE: Please note creating a custom connector takes time and we you rush you might get 404 error. Please be patient and wait for 2-3 minutes once custom connector and then test operation
·
Create
a new simple Power Apps.
·
Connect
to newly created Google Books API and connect in our sample Power Apps.
·
Drag
Text box and Button.
1·
On
Button add the following code:
ClearCollect(Book,GoogleBooks.GetBook({q:TextInput1.Text}))
Book is collection in Power Apps.
ClearCollect(Book,GoogleBooks.GetBook({q:TextInput1.Text}))
Book is collection in Power Apps.
·
Run
the Power Apps and type an ISBN 9780143442295.
·
Go
to File >> Collection >> Book >> we have around 2142 records.
·
Now,
for a complete solution, we need a store our books library solution in some
database repository. For that we keep our books in Common Data Service
(CDS).
I had defined a custom entity called Books and a couple of fields as follows:
I had defined a custom entity called Books and a couple of fields as follows:
a. Books – Primary field – optional
b. Authors – optional
c. Cover – optional
d. Description – optional
e. ISBN - optional
f.
Title
– optional
·
This
is the complete solution
hope this blog post help you
References:
·
Using
Postman collection: https://docs.microsoft.com/en-us/connectors/custom-connectors/define-postman-collection
·
Custom
Connectors in Power Platform: https://medium.com/capgemini-microsoft-team/custom-connectors-in-power-platform-9cc73c333799
·
Google
Books API video sample https://www.youtube.com/watch?v=cSzI093-xgk


1 comment:
Such an informative post. Thank you for sharing
Office 365
Post a Comment