We observed earth hour in our own special way in Singapore. We did our bit for the environment by switching off our lights and heading out to East Coast Park.
As we lay on the beach and looked at the stars we thought to ourselves that until humanity realizes the consequences of not being prudent about saving our resources it could become too late.
Sunday, March 29, 2009
Monday, January 26, 2009
CAML and DateTime issues and the solution.
Hi Friends,
During one of my projects, I had to work on SPQuery objects, SPList, SPListItemCollection, CAML and date time formats. Let me introduce me business case:
Business case:
Its for the team calendar. If a team member apply for vacations and public holiday falls during his/her vacations then system should deduct that number of public holidays.
Roadblocks:
1) there is no straight forward method for filtering date time functions.
2) SharePoint includes date and time parts. But my case just needs date and not time.
My Solution:
I created a function called as GetBankHolidays with 3 parameters:
1) Start Date for team member (date1)
2) End date for team member (i.e. End date - Start date = total number of days for his vacation) (date2)
3) SPItemEventProperties
4) Firstly, get date range for SPQuery.
It can easily defined like this:
Start date of team member
End date of team member
>> query.Query = "<Where><And><Geq><FieldRef Name='Day' /><Value Type='DateTime' IncludeTimeValue='FALSE'>" + date1 + " </Value></Geq><Leq><FieldRef Name='Day' /><Value Type='DateTime' IncludeTimeValue='FALSE'>" + date2 + "</Value></Leq></And></Where>";
5) Secondly, we need to use SharePoint function. But we need to include one more namespace: using Microsoft.SharePoint.Utilities;
SPUtility.CreateISO8601DateTimeFromSystemDateTime(date1) and
SPUtility.CreateISO8601DateTimeFromSystemDateTime(date2).
>> query.Query = String.Format("<Where><And><Geq><FieldRef Name='Day' /><Value Type='DateTime' IncludeTimeValue='FALSE'>{0}</Value></Geq><Leq><FieldRef Name='Day' /><Value Type='DateTime' IncludeTimeValue='FALSE'>{1}</Value></Leq></And></Where>", SPUtility.CreateISO8601DateTimeFromSystemDateTime(date1), SPUtility.CreateISO8601DateTimeFromSystemDateTime(date2));
6) Thirdly, we also need to ignore the time part. This can be done by "IncludeTimeValue" attribute.
>> query.Query = String.Format("<Where><And><Geq><FieldRef Name='Day' /><Value Type='DateTime' IncludeTimeValue='FALSE'>{0}</Value></Geq><Leq><FieldRef Name='Day' /><Value Type='DateTime' IncludeTimeValue='FALSE'>{1}</Value></Leq></And></Where>", SPUtility.CreateISO8601DateTimeFromSystemDateTime(date1), SPUtility.CreateISO8601DateTimeFromSystemDateTime(date2));
The final function be obtained by GetBankHolidays.
/// <summary>
/// Computes no. of bank holidays during user's vacation and return an INT ( = number of bank holidays)
/// </summary>
/// <param name="date1"></param>
/// <param name="date2"></param>
/// <returns></returns>
public static int GetBankHolidays(DateTime date1, DateTime date2, SPItemEventProperties properties)
{
using (SPWeb web = properties.OpenWeb())
{
// counter for bank holidays
int count = 0;
SPListItemCollection items = null;
SPList holidaysList = web.Lists["Bank Holidays"];
SPQuery query = new SPQuery();
query.Query = String.Format("<Where><And><Geq><FieldRef Name='Day' /><Value Type='DateTime' IncludeTimeValue='FALSE'>{0}</Value></Geq><Leq><FieldRef Name='Day' /><Value Type='DateTime' IncludeTimeValue='FALSE'>{1}</Value></Leq></And></Where>", SPUtility.CreateISO8601DateTimeFromSystemDateTime(date1), SPUtility.CreateISO8601DateTimeFromSystemDateTime(date2));
while (date1.Date <= date2.Date)
{
items = holidaysList.GetItems(query);
foreach (SPListItem item in items)
{
if (Convert.ToDateTime(date1.Date) == Convert.ToDateTime(item["Day"]))
count++;
}
date1 = date1.AddDays(1);
}
return count;
}
Happy programming!
Cheers,
Aroh
Sunday, January 18, 2009
How to: Creating a SharePoint 2007 feature
In this tutorial,I will show, how to develop a feature for SharePoint 2007 from the scratch. In our case, I will use item event handler and calendar list. What I will be showing is that SharePoint users can add, modify their entries but if they delete an calendar item then they could not delete.
Prerequisite:
1) Download WSPBUILDER, get it here
2) Download SharePoint Utility, get it here
Steps:
1) Create the class library.
>> Open Visual Studio 2008 >> create new class library

Project Name: CalendarEventHandler and click OK.
>> Add Reference to SharePoint services assembly.

>> Locate Sharepoint.dll and click OK.

>> Rename Class1.cs to CalendarEventHandler.cs

2) Writing the event handler code
>> Code the event handler.

We be using WSS API and in CalendarAction.cs file, we inherit from SPItemEventReceiver.
Now, we are creating ItemDeleting method and override the our own custom code. In fact, we are creating a very simple event handler but we can really enhance the event handler and manipulate one list with update another lists. I would be writing a blog about more enhance ItemEventReceiver in few days time.
The ItemDeleting method can be called and the properties parameter contains detailed information about fired that event.
>> When in user deletes an item, then ItemDeleting event is fired asynchroneously i.e. before an item is deleted.
3) Sign the assembly
>> Once when done with the coding, we need to compile and sign the assembly.
>> Follow these steps:
>> Solutions Explorer >> Properties >> Signing >> New.

>> Create a new strong name.

>> Now, we use WSPBuilder to "Copy to GAC".
Right click on Solutions Explorer >> WSPBuilder >> Copy to GAC.

>> We double check if the assembly is successfully installed.
C:\WINDOWS\assembly


4) Creating the resource files
>> SharePoint feature besides compiled dll, requires some other files on the server too. The folder structure (called as "12" hive) and just add into this folder structure.
>> Right click on Solutions Explorer >> Add this folder structure.

>> There 2 xml files in the folder structure.
>> feature.xml and code is as follows:

Create GUID can be obtained from Tools >> Create GUID


>> elements.xml
This file will attach the event handler (CalendarAction.cs code) to a particular list ("Calendar List")
This is the code:

Some important points to be noted:
i) ListTemplateId="106". 106 corresponds to "calendar event". Complete list ListTemplateId could be found here.
ii) In our case we have added just one Receiver i.e. ItemDeleting. But in real buisness solutions we may need more than one receiver like ItemAdding, ItemAdded ItemUpdating, ItemUpdating etc for e.g.

iii) There is one more SharePoint Utility package. Its for ItemDeleting code with corresponding lists. In our case its Calendar list.
5) Building wsp and deploying to server
Once xml files have been done, we need to building wsp (What is WSP?? A solution is a deployable, reusable package that can contain a set of Features,web parts site definitions, and assemblies that apply to sites, and that you can enable or disable individually.It allows the SharePoint administrators to easily deploy the customizations, even scheduled deployments and multi front-end-webserver deployments are supported.)
>> Right click on Solutions Explorer >> WSPBuilder >> Build WSP

>> When WSP has been done, we just need to deploy to server
>> Right click on Solutions Explorer >> WSPBuilder >> Deploy

>> Now, check in Central Administration if WSP has been successfully installed.

>> We go to SharePoint site, and activate the feature.


6) Testing the feature.
>> we can add a new Calendar item and try to delete the same to test our new feature.


CONGRATS!! we have developed a simple Calendar event handler successfully.
These are some other tips for event handlers.
>> If you want to add more one more item event handler like ItemAdding, ItemAdded, ItemUpdating, ItemUpdated to existing Calendar event handler (like we did on this walk through), then we have to follow steps steps:
i) Uninstall CalendarEventHandler.dll (c:\WINDOWS\assembly)
ii) In Central Administration, Retract the CalendarEventHandler.wsp and Delete the solution.
iii) In CalanderAction.cs file, code new event handlers (new methods) like ItemAdding, ItemAdded, ItemUpdating etc.
iv) compile it and copy to GAC using WSPBuilder.
v) Build WSP and deploy to server.
THATS IT!
Happy programming!
Saturday, November 15, 2008
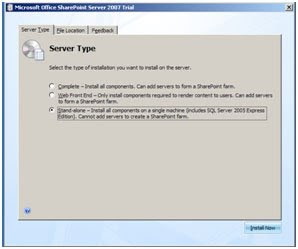
How to: Install and configure Sharepoint server 2007 on a stand-alone computer (with MS Virtual PC)
I have good experience in Asp.net 2.0 and little experience in SharePoint server 2003. But I really and desperately want to learn the intricacies about SharePoint server 2007. I knew that SharePoint is a server technology and need to install on a windows server 2003/2008. Apparently, I search a lot and could find any relevant document about its installation and usage. Finally, I wrote a blog about its installation and configuration.
My development machine runs Windows Vista, so I can’t install SharePoint locally. But for my SharePoint development tasks and learning, I used Microsoft Virtual PC. So, we can create a virtualized environment. For our case we need these:
1. Virtual Windows Server 2003.
2. SQL server Express Edition.
3. SharePoint server.
4. Visual studio 2008 Express and Visual Studio 2008 Extensions, version 1.2.(for ASP.NEY 2.0 and web part development)
5. SharePoint Designer.(optional)
Install Windows Server 2003 on Virtual PC and SharePoint server:
1. Download and install Microsoft virtual PC.
http://www.microsoft.com/downloads/details.aspx?FamilyId=28C97D22-6EB8-4A09-A7F7-F6C7A1F000B5&displaylang=en
Microsoft says: “With Microsoft® Virtual PC 2007, you can create and run one or more virtual machines, each with its own operating system, on a single computer. This provides you with the flexibility to use different operating systems on one physical computer.”
2. Download and install Microsoft Windows Server 2003 R2 Enterprise Edition VHD.
http://www.microsoft.com/downloads/details.aspx?FamilyID=77f24c9d-b4b8-4f73-99e3-c66f80e415b6&displaylang=en
Microsoft says: “The Microsoft VHD Test Drive Program provides customers with an enhanced server-based software evaluation experience that’s faster, better supported and more flexible. You can now access the entire catalog of pre-configured Microsoft and partner products and solutions in the VHD format and start evaluating and testing today from www.microsoft.com/vhd.”
In fact, this server stays for a month and we need to activate later on.
3. Then we need to click on the VHD file (WIN2K3R2EESP2) and double click it. It will open the “Virtual PC console”.
4. Once we are done with these steps we have to configure the “Virtual PC console”.

Click on “settings”, user memory section maximize the memory to 1500 MB.

Then under networking section, use your network adapter (host adapter). We can have more than one adapter. It’s for Virtual PC so that we can browse the network virtually.

NOTE: Your desktop or laptop should have high end configuration.
5. On Windows Server 2003 Login as
a. Username: Administrator
b. Password: Evaluation1
Now follow these steps in sequence. Don’t mess up the sequence otherwise you need to reinstall the Windows server 2003 again!
6. Activate IIS.
Control Panel >> Add /Remove Window s components >> Check “Application Server”.
It will take few minutes and after a while wizard will show end screen. Just click “Finish”.
Control Panel >> Add /Remove Window s components >> Check “Application Server”.
It will take few minutes and after a while wizard will show end screen. Just click “Finish”.

7. Right click on My Computer >> Manage

Locate, Local users and Group >> Users >> Right click on New User

Locate, Local users and Group >> Users >> Right click on New User

Create a new user with these login details:
Username: sps_login
Password: pass@word1

And right click on Properties >> Member Of >> and add these members.
>> IIS_WPG
>> Power Users

8. We can download all the evaluation versions in a particular folder “SharePoint Info” (real operating system, for me was VISTA) and we can copy it our Virtual Server.

The click the “folder” icon for sharing the real files to virtual server.

Then, we need to copy “real SharePoint Info” files into “Virtual Server’s” desktop

Then, we need to copy “real SharePoint Info” files into “Virtual Server’s” desktop
9. Now we need to install couple of things:
Download SQL server Express Edition (free) with
Download SQL server Express Edition (free) with
a. .Net Framework 2.0 Redistributable
http://www.microsoft.com/downloads/details.aspx?FamilyID=0856EACB-4362-4B0D-8EDD-AAB15C5E04F5&displaylang=en
http://www.microsoft.com/downloads/details.aspx?FamilyID=0856EACB-4362-4B0D-8EDD-AAB15C5E04F5&displaylang=en
b. .Net Framework 3.0 Redistributable
http://msdn.microsoft.com/en-us/netframework/bb264589.aspx
(.Net Framework 3.0 Redistributable it’s for workflow component )
http://msdn.microsoft.com/en-us/netframework/bb264589.aspx
(.Net Framework 3.0 Redistributable it’s for workflow component )
c. SQL server Express Edition (SQLEXPR.EXE , 53.5 MB) http://www.microsoft.com/downloads/details.aspx?familyid=220549b5-0b07-4448-8848-dcc397514b41&displaylang=en
10. All program >> Microsoft Sql Server Express 2005 >> Sql Server management studio
11. Connect to Database:


12. Locate Security >> (Right click) Login >> new login >>
13. Click on Search >> Search for “sps_login”


14. Select the “Server roles” and check “dbcreator”, “SecurityAdmin”.

15. For Activating Active directory, Click on “Manage your server” >> Add or remove role. Then follow subsequent steps. This step could be optional. But if you have to use AD, first we should AD and then Install MOSS 2007.
NOTE: If we do it the other way round (MOSS 2007 and then AD) it will create issues and we have to reinstall everything.
Installation and configuration of MOSS 2007.
NOTE: If we do it the other way round (MOSS 2007 and then AD) it will create issues and we have to reinstall everything.
Installation and configuration of MOSS 2007.
16. Download the Microsoft Office SharePoint Server trial. We need to register using hotmail account. Only after that we could able to download.
Microsoft Office SharePoint Server 2007 Standard: XJMKW-8T7PR-76XT6-RTC8G-VVWCQ
Microsoft Office SharePoint Server 2007 Standard: XJMKW-8T7PR-76XT6-RTC8G-VVWCQ
Microsoft Office SharePoint Server 2007 Enterprise: F2JBW-4PDJC-HKXTJ-YCKRP-T2J9D
Use Enterprise version as it has all the features.
Use Enterprise version as it has all the features.
17. Double click on OfficeServer.exe
Note: During the installation Microsoft Office SharePoint Server trial, you may get some error saying that we need to “Activate” extension. Just “Activate” the service on IIS Manager.
Note: During the installation Microsoft Office SharePoint Server trial, you may get some error saying that we need to “Activate” extension. Just “Activate” the service on IIS Manager.


18. Check the “Terms of Agreement”.

19. Choose the “Advanced” installation.

20. Select the “Complete” server type option.

21. When the installation completes click on the Close button to proceed the SharePoint Products Configuration wizard.

Using the SharePoint Products Configuration wizard.

Using the SharePoint Products Configuration wizard.
22. An information dialog box will appear, click “Yes” to continue.
23. Select “No, I want to create a new server farm” and then click Next.

24. Specify configuration Database settings. Click “Next” to continue. The configuration database settings will appear.
a. Database server: win2k3r2ee\SQLEXPRESS
b. Database name: sharepoint_config
c. Username: sps_login
d. Password: pass@word1 and click next.
25. 

26. The “Central Admin Web Application”. Check the “Specific port no” and click “Next”.
27. 

28. Last step “Configuration SharePoint and Technologies” will appear. 9 tasks will be performed. It will take several minutes.
29. 


1. Topology and Services (Servers, Services, Incoming/outgoing email settings etc.)
2. Security Configuration (Service accounts, Antivirus, blocked file types etc)
3. Logging and reporting.
4. Upgrade and migration.
5. Global Configuration (Timer job status, Master site directory settings etc. )
6. Backup and restore.
7. Data Configuration.
8. Content Deployment.
30. Start >> SharePoint 3.0 Central Administration. Click it. Provide the username/password credentials.

31. Click on “Operations” tab and click on “Servers in farm” under “Topology and services”.
>> Click on the server name (WIN2K3R2EE).

>> Click on “Office SharePoint Server Search”.
(NOTE: In my case, I have enabled this service. But we have to enable this service by activating it)

>> Fill the details as follows.
a.) Check both the checkboxes. (User the server for indexing content, Use this server for serving search queries)
b.) Enter the email address.
c.) Set up the Farm’s service account.
Username: WIN2K3R2EE\sps_login Password: pass@word1
and Click OK. “Office SharePoint Server Search” activated now.

32. Click on “Operations” tab and click on “Services on server” under “Topology and services”.

Select Web Server for medium server farms, and click on “Windows SharePoint Services Help Search”. Now, we need to active this service.
Fill the details as follows.
a.) Service account: Username: WIN2K3R2EE\sps_login Password: pass@word1
b.) Content Access Account: Username: WIN2K3R2EE\sps_login Password: pass@word1
Click on “OK”.

All the services are activated.
33. Activate Shared Services Provider (SSP).
>> Application Management >> Office SharePoint Server Shared Services >> Click on “Create or configure this farm's shared services”.

>> Click on “New SSP”
>> Fill in the default fields and enter the Username/Password as follow: Administrator/Evalution1
>> Click “OK”
>> This screen will be shown up:

34. Defining “Create or extend Web application” and “Create site collection”.
Create or extend Web application:
>> Application Management >> SharePoint Web Application Management >> Create or extend Web application
>> In the Application pool, set the security account:
Username: WIN2K3R2EE\sps_login
Password: pass@word1
>> Click “OK”
Create site collection:
>> Application Management >> SharePoint Site Management >> Create site collection
>> Fill the form as follows
a. Title: Sales sites
b. Description: Sale group site collection
c. URL: /sites/SalesSites
d. Select a template: Enterprise >> Document centre.
e. Primary Site Collection Administrator: Username: WIN2K3R2EE\administrator
f. Click “OK”
g. We will see, a new site is created.

h. Please see the screen shot of our new Sales Site.


35.
Visual Studio 2005 and its extensions for SharePoint
36. For Coding Part (Web Part etc), we need to install Visual Studio 2008 Express Edition (Free version).
http://www.microsoft.com/express/download/default.aspx
Download the Visual Studio 2008 Express Edition All-in-One DVD.
This DVD contains all the Express products as well as optional components in a single image (ISO) file.
NOTE: Visual Studio 2008 Express Editions with SP1 does NOT include MSDN Express Library. Be sure to download the library separately.
37. Download WSS 3.0 SP1 http://www.microsoft.com/downloads/details.aspx?FamilyId=4191A531-A2E9-45E4-B71E-5B0B17108BD2&displaylang=en
38. Download WSS 3.0 Tools: Visual Studio 2008 Extensions , version 1.2
http://www.microsoft.com/downloads/details.aspx?familyid=7BF65B28-06E2-4E87-9BAD-086E32185E68&displaylang=en
References:
MSDN
Cheers,
--Aaroh
http://www.microsoft.com/downloads/details.aspx?familyid=7BF65B28-06E2-4E87-9BAD-086E32185E68&displaylang=en
References:
MSDN
Cheers,
--Aaroh
Subscribe to:
Comments (Atom)
-
 Hi all, I was quite interested in the key note by Steven Sinofsky ( President, Windows and Windows Live Division @ Microsoft) on Channel 9...
 -
 Hi All, I am working on PowerApps for couple of days and specifically for SharePoint Online. I have worked with other 3 rd party Fo...
 -
While working for SharePoint patches could be a difficult task. Specially, error logs could be very misleading and much more to comprehend...