Hi all,
I have read an article by Randy Williams where he developed a Silverlight application which does a multiple-file check out. He has beautifully explained all tricks and some issues on SharePoint 2010 Beta version.
I will split into two parts. One about development of Silverlight application and second a SharePoint 2010 project.
PART1: Create a Silverlight application
Step1: Fire up Visual Studio 2010 Beta2 or RC and choose default Silverlight template. Type in the name of project as "SilverlightCheckOut"
Step2: Open up MainPage.xaml file. Drag 2 controls. A listbox and set the SelectionMode property to multiple. A button and in the Content property to "Check Out".
Step4: Go to MainPage.xaml in designer mode. Select the Grid element the xmal >> In the Properties panel click on events icon (lighting icon) >> Double click on "Loaded" property which will generate an event.
Step5: Go to code view and add using statement for the SharePoint client's reference and we prefix it with SP to avoid some object name conflicts . (Please view Randy's tip here)
We also add some class variables as well.
Step6: In the UserControl_Loaded event, we initialize current context and corresponding web, list and items. The main reason for designing client object model is to reduce the number of server round trips and thereby increases the efficiency dramatically Therefore, commands such as:
//batch up work to do. No call to the server
ctx.Load(myList);
ctx.Load(myItems);
//Call to the server
ctx.ExecuteQueryAsync(getRequestSucceeded, getRequestFailed);
just batch up the commands and there is no talking to server post. Only "ExecuteQueryAsync" make a call to the server with all the commands or batches in one go.
getRequestSucceeded and getRequestFailed are delegates which I cover in later steps.
Step8: After we execute "ctx.ExecuteQueryAsync(getRequestSucceeded, getRequestFailed);" this command, a server call is made and all the commands or batches are processed. If the code works successfully, getRequestSucceeded callbak delegate will run. It has to be noted that Silverlight calls are always asynchronous unlike traditional calls which are synchronous (or blocking). Therefore, Silverlight has a separate thread to avoid the UI does not locked up. It gives a better user experience.
Dispatcher.BeginInvoke static method: Silverlight run on a separate thread. If we want to change anything in UI, we must do on the UI thread. The Dispatcher class greatly simplifies calling the UI thread with a static method BeginInvoke. This way, with just a line of code, we can update the UI. Therefore, we are working on results and bind to the listbox, we must do this on UI thread. The Dispatcher class guarantees that this code will be executed on the UI thread.
Step9: Double click on the "Check Out" button.
On this button event, we check how many documents the user has selected. Subsequently, we batch up the selected documents and execute "ExecuteQueryAsync" method.
Step10: "checkOutRequestSucceeded" and "checkOutRequestFailed" methods have to processed as shown below.
PART2: Create a SharePoint project.
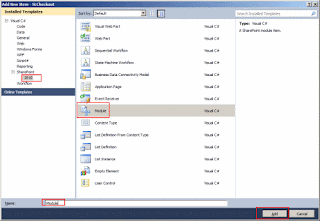
Step11: Create a New project in VS2010 RC New Project >> SharePoint 2010 as template >> Choose "Empty SharePoint Project" >> Project Name: SLCheckOut >> Click OK.
Step13: Go to File menu >> Add >> Existing project >> Navigate to SilverlightCheckOut project. Now, we will get to projects.
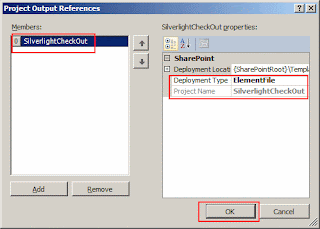
Step14: We have to configure on the module element. If we click on Module on and look at the properties. There is a property named "Project Output References". In this part, we tie this SharePoint package (WSP) which has just single module file in it with Silverlight file which is XAP file and deploy it as the module. Two properties have to be defined:
Deployment Type: ElementFile
Step16: Go to SharePoint 2010 site >> Edit >> Insert >> Web Part >> Under categories, choose "Media and Content" >> Silverlight Web Part >> Add >> Navigate to the XAP file which is under Videos, fill in the URL property: click OK button and our web part has been created.
Step17: We will get few documents from Shared Documents library in our new Silverlight application. Select few documents and hit the "Check Out" button. A message box will pop up.
Navigate to Shared Documents document library and we can observe that few documents have been check out.
Cheers,
--aaroh


No comments:
Post a Comment