Hi all,
In previous blog, we have created a Silverlight application and upload the XAP file onto SharePoint. This approach is not good way to deploy the XAP file. Its always better to wrap XAP file into SharePoint solution (WSP). The reason for this is that, if later on business requirement does not Silverlight XAP file then there is no way we delete that XAP file. We have to manually delete from a document library. If we develop a WSP file instead, then infrastructure team delete the solution. This way, the XAP file is automatically delete from the document library. We will split in two parts!
PART1: Create SharePoint 2010 project.
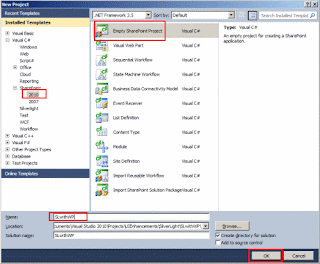
Step1: Create a New project in VS2010 RC New Project >> SharePoint 2010 as template >> Choose "Empty SharePoint Project" >> Project Name: SLwithWP >> Click OK.
Step2: Verify the site you want to debug and choose "Deploy as a farm solution".
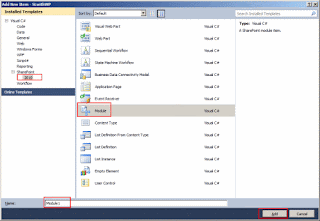
Step3: Right click on "SLwithWP" solution >> Add >> New Item >>
Step4: Add the module as shown below:
The module element is typically used when files or set of files to deployed on the content database. SharePoint 2010 by default creates a "Sample.txt" as a sample. For instance, we rename the "Sample.txt" to "Sample123.txt", then element.xml if will automatically reflected. VS2010 does refracts so that those files are in sync. Module is a deployment vehicle for SharePoint.
PART2: Add Silverlight project as an existing project.
Step5: Go to File menu >> Add >> Existing project >> Navigate to SilverlightOM project and not SilverlightOM.Web project which we created in last post. The reason for this is that, we have to work on MainPage.xaml and App.xaml.
Step6: The solution will have 2 project as shown below:
Step7: We have to configure on the module element. If we click on Module on and look at the properties. There is a property named "Project Output References". In this part, we tie this SharePoint package (WSP) which has just single module file in it with Silverlight file which is XAP file and deploy it as the module. Two properties have to be defined:
Deployment Type: ElementFile
Project Name: SilverlightOM
Step9: I have already defined a Videos document library via SharePoint UI. We just add this part in module element. Deploy the solution.
Step10: Go to SharePoint 2010 site, navigate to Videos document library, and you will fine a folder named "Module1"
Step11: Go to SharePoint 2010 site >> Edit >> Insert >> Web Part >> Under categories, choose "Media and Content" >> Silverlight Web Part >> Add >> Navigate to the XAP file which is under Videos, fill in the URL property: click OK button and our web part has been created.
And this is output:
To recap the steps:
- Create a new SharePoint 2010 project (SLwithWP) in VS2010
- Add a new module element
- Add an existing Silverlight project (SilverlightOM)
- Configure the "Project Output References" in module element.
- Add the reference to the XAP file in the module and deploy the solution.
Cheers,
--aaroh
Download the source here.
Reference:
Interview with Mike Morton about implementing a Silverlight SharePoint WebPart with Visual Studio 2010


No comments:
Post a Comment