Sunday, December 25, 2011

How to: Install and Configure SharePoint 2010 - Part 2

Hi All,
I will be continuing my blog post and this time I will walk through installation and configuration of SQL Server 2008 R2 and SharePoint 2010.
Lets get started.

Setting up a SQL Server 2008 R2 instance:

Step1: 
Install trail version of SQL Server 2008 R2 Enterprise version and click set up file.
Step 2:
We may get some warnings such as domain controller and Windows firewall but skip them and click on the Next button.  

Step 3: 
The screen asks for kind set up roles. We supply "SQL Server Feature Installation" and click on the Next button. 
Step 4: 
The wizard asks for features to be installed and click on the Next button. 

Step 5:
We have to select SQL Server instance, choose "Default instance" and click on the Next button.
Step 6: 
The wizard requires "Server Configuration". and for the service account, we will supply sp_sql and click on the Next button.

Step 7: 
In the database configuration we will enter "Administrator" and "sp_admin" as the SQL server administrators and click on the Next button.
Step 8: 
The wizard checks installation configuration rules and click on the Next button.
Step 9:
"Ready is install" is shown up, it will displays SQL instance details. We double check our configuration and click on the Next button.

Step 10:
The set up will take few minutes and displays successful message. 
Configure SQL Server 2008 R2 instance: 

Step 11:
All Programs >> Microsoft SQL Server 2008 R2 >> Configuration tools >> Click on SQL Server Network >> Select "Protocols for MSSQLSERVER" and for option toggle TCP/IP to Enable. 
Step 12: 
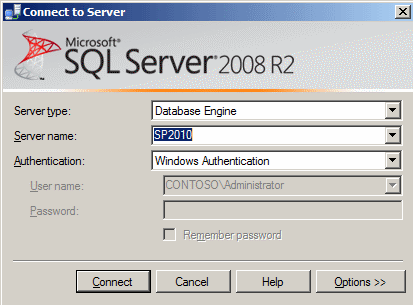
Now we navigate to the "SQL Server Management Studio" and connect to the SQL server instance. 

Step 13: 
Go to Security section >> Right click on "sp_admin" service account and give db_creator and securityadmin roles. 

Step 14: 
Download the SQL server 2008 R2 SP1 on the server. 
Step 15: 
The wizard will indicate the patch level of current SQL server instance.The current SQL server patch level is 10.50.1600.1

Step 16: 
The wizard show the update version.  
We can navigate to check the updated patch level by querying in SQL Server management console:
These are handy scripts to determine SQL Server 2008 editions and patch levels. 

Connect to the instance of SQL Server, and then run the following query
Select @@version

Connect to the instance of SQL Server, and then run the following query
SELECT SERVERPROPERTY('productversion'), SERVERPROPERTY ('productlevel'), SERVERPROPERTY ('edition')
Here is the MSDN link for more info. 

Install SharePoint 2010:
SharePoint 2010 installation is quite pretty straightforward. However, we have to be careful while configuring it. There are brief topics which we will cover. 
  • Installing SharePoint 2010 prerequisites. 
  • Lay down the SharePoint 2010 binaries
  • Run the PS config. Part does lot of things such as link up the SQL Server i.e. provision the SP 2010 farm configuration database, specific service accounts, passphrase which is new to SP2010 and provision Central Administration web application)
  • Configure the SharePoint farm either by wizard or manually.    
Step 17: 
Navigate to download link and go to default.hta (and not the setup.exe). "Default.hta" will display a splash screen and we have click "Install software prerequisites" 
Step 18:
The installation requires necessary components to function. Please note that there are few components such as SQL Server and IIS that are required: 
Step 19:   
The license terms (for the prerequisites) has to be accepted. 
The wizard will install prerequisites
Step 20:
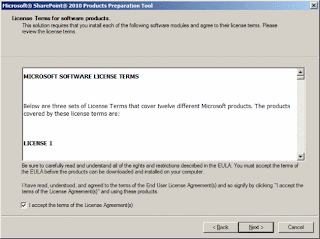
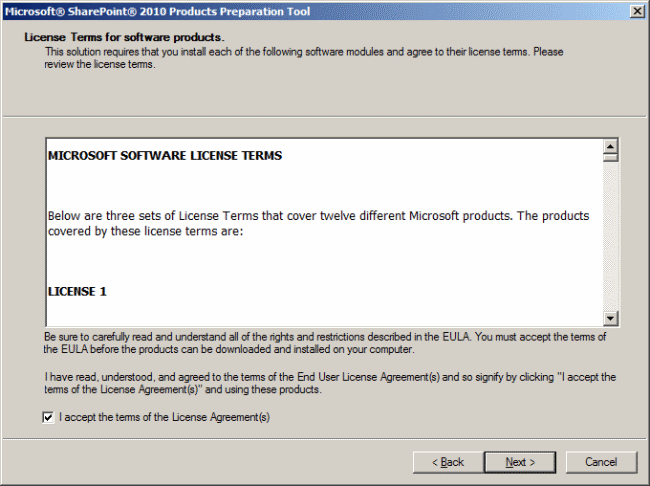
The license terms (for SharePoint 2010 Products) has to be accepted along with license key: 
Step 21:
We now have to furnish the file location where SharePoint 2010 would be installed on the Windows Server 2008 R2. Apparently, in MOSS 2007 if we made a wrong choice on this page then we would have plenty of problems.   
Step 22:
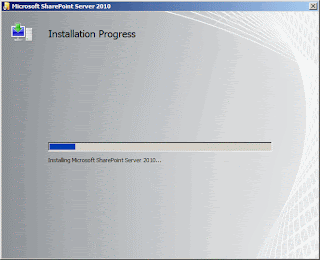
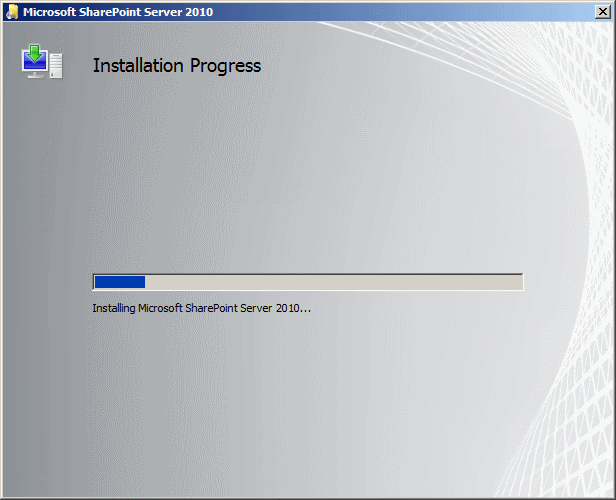
The SharePoint 2010 wizard install the binaries as shown below
Step 23:
The final screen show us that we have to run the SharePoint Products Configuration Wizard.
Step 24:
In this wizard we have to supply name of the database, where its stored as well as the service account for the database access.Click on the Next button.
We are prompted with a warning and we click "Yes" and proceed.
Step 25:
We will connect to a new server farm
Step 26:
This is crucial screen for SharePoint 2010 configuration. In this screen we have to provide: 
Database server: <<SQL Server Instance>> ( for us its SP2010 DB instance)
Database name: SharePoint_FarmConfig. SharePoint will create an instance within SQL Server. It stores metadata and configuration settings for the entire farm.Its a good practice to have a descriptive name of the database.

Database Access Account: It will instruct windows to create a log in to SQL server to give access for SharePoint and create database. This service account which we will plug in, automatically be granted "dbcreator" and "securityadmin" roles as mentioned in my previous blog post.
Step 27:
This is added security for SharePoint 2010 where passphrase to secure farm configuration data. For my usage I entered sp2010!sp2010!
Step 28:
We provide SharePoint Central Administration Web Application and specify port number:
Step 29:
The SharePoint 2010 wizard would display summary of our configuration settings that would be applied to the server.
Step 30:
The SharePoint 2010 configuration kicks in and provision configuration database etc. 
After SharePoint configuration is completed the wizard will display "Configuration Successful" and we click on the "Finish" button. 
Step 31: 
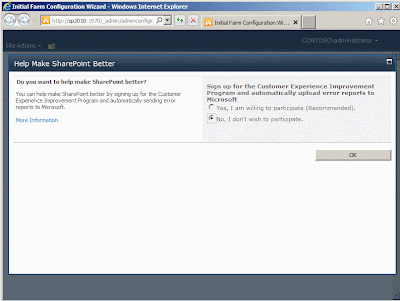
When we click on the Finish button, an Internet Explorer window will open up and prompt to sign up for the customer experience improvement program. We choose "No" and click OK button. 
Step 32: 
The next screen will prompt us to "How do you want to configure your SharePoint farm?". We choose "Start the wizard" option. 
Step 33:
We create a new managed account "administrator", keep all default settings and click on the "Next" button. 
Step 34:
SharePoint 2010 will churn out and provision a new web application.
Step 35:
We simply click the "Skip" button and Central Administration would complete the farm configuration wizard. 
  We then navigate to the "Application Management" and view the Web Application list. The "SharePoint - 80" web application is already provisioned for us. 

I hope this walk through is useful. 
Cheers, 
Aroh

    Sunday, December 18, 2011

    How to: Install and Configure SharePoint 2010 - Part 1

    Hi all,

    Its a long time I posted a blog entry. In fact, its more than 1 year and 3 months to be exact. Anyways, today I will walk through an end to end SharePoint 2010 installation and configuration. I know there are tons of blogs, MSDN entries about this written but I wanted to have complete and holistic step by step installation guide for my own reference and hopefully for others. Here it goes.

    My virtual environment is as follows:
    1. VM Player - A free Virtual machine that can be downloaded here. 
    2. Windows Server 2008 R2 Enterprise here  
    3. SQL Server 2008 R2 Enterprise (64 bit)
    4. SharePoint Server 2010 Enterprise (64 bit)
    Setting up a virtual machine:

    Step1:
    Create a new Virtual Machine via VM wizard and downloaded Windows Server 2008 R2 Enterprise trail version as ISO file.


    Step2: 
    Enter the Windows Server 2008 R2 product key (I put it blank), chose Windows Server 2008 R2 Enterprise 64 bit, entered full name (Administrator), password and confirm password (sp2010). The password should be entered otherwise we may have issues later on.   


     Step3:
     A message pops up about Windows product key. We just skip and click on the "Yes".


    Step4:
    One more message pops up and again we click on the "Yes" button. 


    Step5:
    We then name the Virtual Machine (SP2010) and enter the location of VM. I typically put the VM on D drive on my host PC (Windows 7, 64 bit). 


    Step6:
    We need to specify the virtual disk space. The default settings is 40 GB but I configured to 100 GB.


    Step7:
    Next screen shows the location and other details. However, we need to customize the hardware:


    Step8:
    My PC has 8 GB RAM installed. I allocate 3.5 GB for my virtual machine, configure processors to 2 and other settings.


    Step9:
    The windows server 2008 R2 installation kicks in: 

    Step10:
    Windows Server set up for its first use


    Setting up a Windows Server 2008 R2:


    Step12:
    Windows Server 2008 R2 screen will look like this.
    We also have to rename our server too.


    Step13: 
    Its very important to check of windows updates and it will ask for server reboot.  

    Step14:
    Go to the Server Manager and configure "Internet Explorer Enhanced Security Configuration (IE ESC)" as follows:  

    Setting up a Active Directory Domain Services

    Step15:
    Go to the Server Manager, click on Roles, "Add Roles", check on Active Directory Domain Services.
    It will prompt for installing additional components. 

    Step 16:
    We can view the progress of AD installation


    Step 17:
    The AD installation completes and we need to configure it. 

    Step 18: 
    AD DS kicks in and keep default settings and click Next button.

    Step 19:
    AD wizard asks for an "Existing forest" or "Create a new domain in a new forest". Obviously its our first AD installation on Windows Server 2008 server, we click on latter option.
    Step 20:
    The wizard requires a name of forest root domain. We enter "contoso.com" as the fully qualified domain name (FQDN)


    Step 21: 
    AD will look for any existing domain and look for a verification on the server


    Step 22: 
    Wizard prompts us to set the forest functional level. We set "Windows Server 2008 R2" and click on the Next button.    

    Step 23:
    The next screen asks for selecting for the domain controller. We keep the default settings and click on the Next button.

    Step 24: 
    The next button prompts a warning and simply choose "Yes"
    Step 25: There is another warning about the delegation of the DNS server and again simply choose "Yes"
    Step 26:
    The AD wizard asks for the Database, log files ans SYSVOL folder. We keep the default settings and click on the Next button.
    Step 27:
    The AD wizard asks for the Restore Mode Administrator Password. This option is actually of AD got corrupted then we can easily resurrect using this option. (I entered sp2010!sp2010! )

    Step 28: 
    At last AD wizard shows the summary and we click on the next button.
    Step 29: 
    It will take couple of minutes to complete AD configuration and it will display the completion. It will also requires to reboot the server.
     
    Step 30:
    After server reboot, we need to add few more roles i.e. Application and Web servers.Application server needs additional components as follows:  

    Step 31:
    We also need to check "Web Server (IIS)" while adding roles.


    Step 32: 
    We have to check additional components for the Application Server as follows:
     
    Step 33: 
    We have to check additional components for the Web Server as follows:

    Step 34: 
    Wizard will configure and install these components on the server: 


    Configure SharePoint Services accounts
    Step 35:
    Now we have to create couple of services accounts that are required by SharePoint 2010.
    Navigate to Start >> Administrative Tools >> Active Directory Users and Computers. When its opened Click on the "View"   >> Check "Advanced Features".
    I created an organizational unit called as "SharePoint Accounts" and created 4 users.


    For e.g. I created an account called "sp_sql" (will be used for SQL service account), an account with log-in credentials (sp2010!). The same procedure will be applied to other accounts.  

    We now know why we need these accounts and their usage. 

    SharePoint 2010 Service accounts

    What is a service account?
    A service account is an active directory or a local account  that is NOT used by humans but used by a process. SQL Service has its service account. SharePoint has a couple of services accounts. Service account almost elevate the privileges higher than user accounts are. Therefore its best practice to have services accounts to have least privilege and least service (SQL Server and SharePoint).

    Best practice is that service accounts for SharePoint 2010 should have few accounts and not a single account that does everything. Following are the SharePoint 2010 service accounts: 
    1. Farm account:   It runs on the context of SharePoint and its for farm level configuration. 
    2. Search crawler account: at least to have read privilege to the file system objects that will searched and indexed. 
    3. SQL Service account: For database agent and database engine etc. 
    4. Application Pool accounts: App pool protects memory space of our web application.. This is likely to get into trouble even in SharePoint 2010. Therefore these service account should be chosen well and we should know what is going on. 
    5. User profile synchronization account:  It deals with synchronizing the metadata from user active directory properties and SharePoint back again.
    6. Set up account: This account is used to set up SharePoint when installing SharePoint binaries and run the SharePoint products configuration wizard.  

    Service accounts
    Description
    Type of account
    Permissions
    Farm account
    It runs on the context of SharePoint and for the Farm level configuration (sp_farm)
    Standard domain user account.

    --Local administrators group each WFE (Web Front End)
     --automatically added to the SQL Server Logins, server role, security administrator, "dbcreator" & "securityadmin " in SQL server
    --Identity of the SharePoint central admin application pool
    --Only account with "write" access on SharePoint configuration database
    -- Identity of the Windows SharePoint Services "Timer" service.
    Set up account
    This account is used while installing SharePoint binaries and run the SharePoint products configuration wizard. (sp_admin)
    Standard domain user account
    --Local administrators group on each WFE
    --"sysadmin" and "dbcreator" roles within the SQL Server instance.
    SQL service account
    Its for database agent and database engine (sp_sql)
    Standard domain user account or local system account
    -- Identity of the MSSQLSERVER and SQLSERVERAGENT services
    Search crawler account
    At least to have read privilege to the file system objects that will be searched and indexed. (sp_search)
    Standard domain user account
    Only full access to content
    User profile synchronization account
    It deals with synchronizing the metadata from user active directory properties and SharePoint back again. required to import users from a third party LDAP or another AD domain need to specify the import connection account in SSP Administration when creating the data connection. Requires read access to all attributes for which you want to do a profile import.(sp_usersync)

    Requires read access to all attributes for which we want to do a profile import.

    My next blog would be Installing and configure SQL Server 2008 R2 and SharePoint 2010.  
    I hope this blog gave you more information about SharePoint 2010 internals.

    Cheers,
    Aroh  

    Reference:
    SharePoint George -  Least Privilege Service Accounts
    SharePoint Pro Mag - Least privilege service accounts
    Pauls Wider

    Sunday, October 17, 2010

    How to: Designing List schemas, instances and content types in SharePoint 2010


    Hi all, 

    In this walk through I will step-by-step to develop the a custom list definition, list instance and custom content type.

    Step1: Create a new VS 2010 project. New >> Project >> Visual C# >> SharePoint 2010 >> Empty SharePoint Project. 

    Project name: Lab04_ListsAndSchemas
    .NET Framework 3.5 


    Step2: Right click on the project >> Add >> New Item >> Choose Content type.
    Name: ProductCT. 


    Step3: We create two site columns (fields, site wide) as follows:
    Name: Product Description , Product ID
    Type: Text, Number 

    In the content type, we add field reference as well. 

    Elements.xml:

    <?xml version="1.0" encoding="utf-8"?>
    <Elements xmlns="http://schemas.microsoft.com/sharepoint/">

      <!-- Site Columns -->
      <Field SourceID="http://schemas.microsoft.com/sharepoint/v3"
             ID="{B39F9441-0124-4221-9C64-D61983A3397A}"
             Name="ProductDescription"
             DisplayName="Product Description"
             Group="My Custom Columns"
             Type="Text"
             DisplaceOnUpgrade="TRUE" />

      <Field SourceID="http://schemas.microsoft.com/sharepoint/v3"
             ID="{22A5A133-BC36-4AD4-93EA-A5DE9C36F417}"
             Name="ProductID"
             DisplayName="Product ID"
             Group="My Custom Columns"
             Type="Number"
             DisplaceOnUpgrade="TRUE" />

      <!-- Parent ContentType: Item (0x01) -->
      <ContentType ID="0x01003044473278df426692f1919852d4d8af"
                   Name="Lab04_ListsAndSchemas - ProductCT"
                   Group="Custom Content Types"
                   Description="My Content Type"
                   Inherits="TRUE"
                   Version="0">
        <FieldRefs>
          <FieldRef ID="{fa564e0f-0c70-4ab9-b863-0177e6ddd247}"
              Name="Title"
              DisplayName="Product Name" />
          <FieldRef ID="{B39F9441-0124-4221-9C64-D61983A3397A}"
                    Name="ProductDescription" />
          <FieldRef ID="{22A5A133-BC36-4AD4-93EA-A5DE9C36F417}"
                    Name="ProductID" />

        </FieldRefs>
      </ContentType>
    </Elements>

    Step4: Right click on the project. Add >> New Item >> Choose "List Definition from content type".
    Name: ProductCT


    In this project we have create just one content type. Therefore,  in the drop down list we will see only one content type. In addition, we will create instance of this list. 


    Step5: Lets examine list definition list schema. 
    As we have chose "List Definition from the content type", we will get all the fields such as Product Description and Product ID automatically as illustrated below: 


    However, we should these custom fields in the view as well. Therefore, we add FieldRefs in the BaseViewID="1" view. 


    Step6: List Definitions and instances description. 

    We need to give a meaningful names to the list definitions and instances. Also, in type we should give a number more than 10000.

    Elements.xml (List Definition)

    <?xml version="1.0" encoding="utf-8"?>
    <Elements xmlns="http://schemas.microsoft.com/sharepoint/">
        <!-- Do not change the value of the Name attribute below. If it does not match the folder name of the List Definition project item, an error will occur when the project is run. -->
        <ListTemplate
            Name="ProductListDefinition"
            Type="10005"
            BaseType="0"
            OnQuickLaunch="TRUE"
            SecurityBits="11"
            Sequence="410"
            DisplayName="ProductListDefinition"
            Description="My List Definition"
            Image="/_layouts/images/itgen.png"/>
    </Elements>

    Elements.xml (List Instances)
    <?xml version="1.0" encoding="utf-8"?>
    <Elements xmlns="http://schemas.microsoft.com/sharepoint/">
      <ListInstance Title="Products"
                    OnQuickLaunch="TRUE"
                    TemplateType="10005"
                    Url="Lists/Products"
                    Description="My List Instance">
      </ListInstance>
    </Elements> 

     The project structure will look like this:  

    Build and Deploy the solution. 
    Navigate to the site to view the new content type and list instance. 


    Cheers, 
    --aaroh 

    Download the source here.

    Sunday, October 10, 2010

    Error occurred in deployment of step ‘Activate Features’: the field with ID defined in feature was found in the current site collection or in a sub site.

    Hi all,

    While developing a custom content type, custom list definition based on the custom content type, I got an error while deploying to the SharePoint 2010 server.

    Error:
    ‘Error occurred in deployment of step ‘Activate Features’: the field with ID <New GUID> defined in feature <FeatureGUID> was found in the current site collection or in a sub site.

    Fix: 

    Its a known issue and there couple of workarounds to fix this issue. 

    Workaround 1:• Right click on Project node in Solution explorer and click "Retract".
    • Close VS. This will flush the stale cache.
    • Open the project in a new instance of VS and re-deploy the solution.

    Workaround 2:If closing VS after retract doesn't solve the problem then a longer workaround is:

    • Redeploy the project -> This will show an error during feature activation.
    • Go to "Manage Site Features" under "Site Settings" in SharePoint UI in the browser.
    • Activate and then Deactivate the deployed feature which contains the Field.
    • Retract the Solution in VS i.e. right click on the Project node and click "Retract".
    • Close VS. This will flush the stale cache.
    • Open the project in a new instance of VS and re-deploy the solution.

    Please refer to the MSDN KB article.

    Cheers, 
    --aaroh 

    Friday, September 10, 2010

    Handler "WebServiceHandlerFactory-Integrated" has a bad module "ManagedPipelineHandler" in its module list.


    Hi all,

    I am playing with new IIS 7.5 of late and installed .NET 4 on my Windows 7 machine. I configured IIS to enable ASP.NET and other IIS 6 components. When I tried to browse to my local web site, IIS 7.5 welcomed with this error:

    ------------------------------------------------

    HTTP Error 500.21 - Internal Server Error Handler "PageHandlerFactory-Integrated" has a bad module "ManagedPipelineHandler" in its module list.

    --------------------------------------------
    FIX:

    ASP.NET has been not installed successfully. The following command installs the ASP.NET version that is associated with the version of the ASP.NET IIS Registration tool that you are using, and updates existing ASP.NET applications

    Run this command to fix the issue: 
    %windir%\Microsoft.NET\Framework\v4.0.31319\aspnet_regiis.exe -i

    and it work fine! 

    Cheers,
    --aaroh 

    Reference: MSDN

    Low Code Reimagined with AI + Copilot Pitch Deck - Copy Copilot day (Virtual) - 2023

     Hi All,  I presneded a session at Pune UG on Low Code Reimagined with AI + Copilot Pitch Deck.  Video is at this address  https://www.youtu...