Hi all,
The development and deploying SharePoint solutions, I always use WSPBuilder. WSPBuilder is BEST TOOL for building and deploying WSP packages. I have dealt with both the tools and I preferred WSPBuilder of following reasons:
Pros:
1) Its highly stable and have higher performance.
2) Provides default templates such as Blank feature, Feature with eceiver, Event Handler, Sequential and state based workflows, Web part features etc.
3) Mimics 12 Hive structure.
Cons:
1) List instance, List Templates, Field Controls, List Definition from content type are NOT defined although they can defined with some efforts.
2) Can not reverse engineer the objects such as lists, templates, content types etc.
VSeWSS:
Pros:
1) Ability to get intellisense within all SharePoint framework files
2) Ability for a range of code snippets when within SharePoint framework files such as list instances, list templates, field controls etc. (not available in WSPBuilder).
3) Ability to reverse engineer objects in a SharePoint Site instance to Feature using SharePoint Solutions Generator. (not available in WSPBuilder)
Cons:
1) Performance issue and not very stable. While developing I used to get lot of errors.
2) Does not follow 12 Hive structure.
3) While deploying solutions, we may get this error: No language-neutral solution exists in the store.
4) VSeWSS 1.3 has issues when you deploy WSP packages.
For more information on comparisons between VSeWSS and WSPBuilder follows these links:
>> Solution package development tool comparisons
>> SharePoint Development Tools
In this post, I will move SharePoint soltions from VSeWSS 1.2 to WSPBuilder. Apparently, Migration from VSeWSS to WSPBuilder is easy but there are some little tricks, you face some bugs and other workarounds to get the solutions working.
I am going to create a VSeWSS 1.2 project which will do the following:
1) Create a new custom field control and do some kind of validations using regular expressions.
2) Create a custom content type using those field control.
3) Create a List Definition from that content type.
Its a screen cast from channel 9.
NOTE: I had really tough time using VSeWSS 1.3 extensions and there were lot of issues. I finally reverted back to 1.2.
So, Lets get started:
Download the source
PartA. Create a VSeWSS 1.2 project.
---------------------------------------------------------------------------------------------------
Step1: Open up Visual Studio >> File >> New >> Project >> From "Project Types" select "SharePoint" and from "Templates" select "Empty".

Step2: Right click on the project >> Add >> New Item >> List Instance and name it "Videos"

>> Choose the base type. Select the "Links".

>> Open up the instance.xml, modify the "Title", "OnQuickLaunch" and some default rows in data elements.
<ListInstance FeatureId="00bfea71-2062-426c-90bf-714c59600103"
Title="Videos"
Description="links to the videos"
OnQuickLaunch="TRUE"
Url="Lists/Videos">
<Data>
<Rows>
<Row>
<Field Name="URL">http://www.yahoo.com</Field>
<Field Name="Comments">Link to yahoo website</Field>
</Row>
<Row>
<Field Name="URL">http://www.google.com</Field>
<Field Name="Comments">Link to google website</Field>
</Row>
</Rows>
</Data>
</ListInstance>
>> Right click on the project >> Add >> New Item >> Field Control

Why to do need this is because our field is going to have a specific formatting requirements i.e. some kind of validations must be applied on that field.
Step3: Open up "TimeCode.Field.cs"
We have time span field which has format: "HH:MM:SS.MMMMMMM". We can follow same formatting requirements.
----------------------------------------------------------------------
public override string GetValidatedString(object value)
{
string input = value.ToString();
if (this.Required && string.IsNullOrEmpty(input))
{
throw new SPFieldValidationException("This field is required!");
}
Regex r = new Regex(@"^\d{2}:\d{2}:\d{2}\.\d{7}$");
if (!r.IsMatch(input))
{
throw new SPFieldValidationException("Time code must be in the format of HH:MM:SS.MMMMMMM");
}
return base.GetValidatedString(value);
}
-------------------------------------------------------------------------------------------
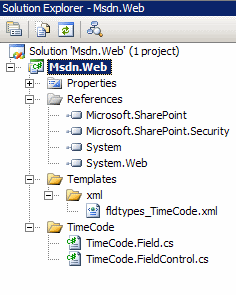
Project structure will be like this:
Step4: Create a content type.
>> Right click on project >> Add >> New Item >> Content type

>> Choose the "Item" from the "Base Content Type"

>> We can see some commented "Fields" and "FieldRef"

>> Uncomment this field. Add 2 more fields namely "URL" and "TimeCodeField"
>> i) "URL" field "ID" is already defined in 12 >> Template >> Features >> Fields >> fieldswss.xml

ii) "TimeCode" field is defined in TimeCode.Field.cs. "ID" is the Guid.

>> Do the same with "FieldRefs"

>> Save the project
Step5: List Definition from the Content type
>> Right click on the project >> Add >> New Item >> Choose "List Definition from the Content type"

>> It will ask for new annotation type we just created a moments ago.We check the "Create an instance for this list. " and click OK. It will create some assets for us. The first asset will be instance definition.

>> Open the "instance.xml", modify the title element "AnnotationList Instance" to "Annotations". Add other elements like "Description", "OnQuickLaunch" etc.

>> Open the next asset "schema.xml". We minimize the outlining of the elements of schema.xml so that we can seek through. Under "Metadata" we have element called as "Views". The BaseViewId="1" is the default view. If we expand that view, it defines elements called as "ViewFields". These are the columns which we will see i.e. "Attachments" and "LinkTitle". We will add 3 more "FieldRefs" in the default view namely "AnnotationID", "MediaPath" and "TimeCode".

Step6: Feature Receiver
>> Apparently, when we provision the SharePoint solution and when we try to deactivate the list, it does not clean up automatically. We will do it on this part here.

>> Add SharePoint reference. (using Microsoft.SharePoint)
>> Make the class public and inherit from SPFeatureReceiver and implement abstract classes.
>> In "FeatureDeactivating" method we clean the "Annotation" list
public override void FeatureDeactivating(SPFeatureReceiverProperties properties)
{
using (var web = properties.Feature.Parent as SPWeb)
{ if (null != web)
{
SPList list = web.Lists["Annoataions"];
if (null != list)
list.Delete();
}
}
}
>> On top of class "ListFeatureReceiver", we add one attribute [CLSCompliant(false)]
Step7: WSP View
>> Open up the feature.xml under "Videos" folder.
>> We add 2 main elements
i) ReceiverClass: "Msdn.Web.ListFeatureReceiver"
ii) ReceiverAssembly:. For this, we have to compile the solution and use "WSPBuilder" option to "Copy to GAC".
Go to C:\Windows\Assembly, locate the Msdn.Web, right click and get the "PublicKeyToken"
and copy the token in the code as follows:
ReceiverAssembly="Msdn.Web, Version=1.0.0.0, Culture = neutral, PublicKeyToken = 9f4da00116c38ec5"
>> Deploy the solution

If you followed the steps, you will be able to test the solution.


------------------------------------------------------------------------------------------
PartB: Moving VSeWSS project to WSPBuilder project.
Well, migrating the VSeWSS to WSPBuilder is easy but there are some tricks. Its because VSeWSS DOES NOT follow 12 hive structure but WSPBuilder does. There are some other tricks which I will present in following steps.
Field Control and field validations:
Step8: Open upVisual Studio >> File >> New >> Project >> WSPBuilder project. Project name: WSPFieldControl
Right click on the project >> Add >> New Item >> WSPBuilder >> Feature with receiver
ListFeatureReceiver and update the feature settings as follows:

Step9: Now, we have to follow the 12 hive structure here. In 12 hive ,we have XML folder where fieldtypes are defined. under 12 hive Therefore, we create a "XML" folder and copy "fldtypes_TimeCode.xml".
Moreover, in the "FeatureCode" folder, we copy "TimeCode.Field.cs" and "TimeCode.FieldControl.cs".
Build the solution and may get this error:
BUG1:

Just Add Reference >> Locate Microsoft.SharePoint.Security and build it again.
Build WSP >> Deploy.
>> Go to the SharePoint site >> Site Actions >> Site Settings >> Activate "Field Control".
To test of new field control is added, Go to the "Tasks" list >> List Settings >> "Create Column"
Strange! New Field control is not added.

>> The reason is that we to rename the namespace "Msdn.Web" to "WSPFieldControl" in "TimeCode.Field.cs" and "TimeCode.FieldControl.cs"

>> Deploy the solution
To test of new field control is added, Go to the "Tasks" list >> List Settings >> "Create Column" >> Choose "TimeCodeField" and hit "Ok" button.
We will get this error:

In general,
BUG2:
Field type <fieldname> is not installed properly. Go to the list settings page to delete this field.
Apparently, troubleshooting this issue took lot of time. I compared "Msdn.Web" project, and examined "fldtypes_TimeCode.xml".

I had to use the assembly, which is "WSPFieldControl, Version=1.0.0.0, Culture=neutral, PublicKeyToken=600c68ca084bfb1c""

>> Deployed the solution again and To test of new field control is added, Go to the "Tasks" list >> List Settings >> "Create Column" >> Choose "TimeCodeField" and hit "Ok" button.
Again, you will get this error.

>> After some more research, I found besides assembly, I have to also add the class i.e.
namespace.classname, assembly name, version, culture, publickeytoken
"WSPFieldControl.TimeCodeField, WSPFieldControl, Version=1.0.0.0, Culture=neutral, PublicKeyToken=600c68ca084bfb1c"
>> Deployed the solution again and To test of new field control is added, Go to the "Tasks" list >> List Settings >> "Create Column" >> Choose "TimeCodeField" and hit "Ok" button. It will work properly this time. Phew!!
Content type
Step10: For developing the content type is quite simple. Under "ListFeatureReceiver" feature, we copy the content types in "elements.xml"

Also modify the "feature.xml" and update the scope to "Site" as content types are deployed on site level.
List definition with content types
Step11: Follow the same steps in previous blog post.
>> In "ListFeatureReceiver" feature create 3 folders "DocLib", "ListInstances", and "ListTemplates"
>> In feature.xml, get the feature ID and copy this is to ListDefinition.xml, schema.xml and ListInstances.xml.
>> a) feature.xml

b) schema.xml

c) ListTemplates.xml

d) elements.xml (List Instance)

>> Deploy the solution.
>> Go to the SharePoint site >> Site Actions >> Site Collection Feature >> Activate the feature "Field Control".

>> On the home page, we can see the "Annotations" list.

Cheers,
--Aaroh
The development and deploying SharePoint solutions, I always use WSPBuilder. WSPBuilder is BEST TOOL for building and deploying WSP packages. I have dealt with both the tools and I preferred WSPBuilder of following reasons:
Pros:
1) Its highly stable and have higher performance.
2) Provides default templates such as Blank feature, Feature with eceiver, Event Handler, Sequential and state based workflows, Web part features etc.
3) Mimics 12 Hive structure.
Cons:
1) List instance, List Templates, Field Controls, List Definition from content type are NOT defined although they can defined with some efforts.
2) Can not reverse engineer the objects such as lists, templates, content types etc.
VSeWSS:
Pros:
1) Ability to get intellisense within all SharePoint framework files
2) Ability for a range of code snippets when within SharePoint framework files such as list instances, list templates, field controls etc. (not available in WSPBuilder).
3) Ability to reverse engineer objects in a SharePoint Site instance to Feature using SharePoint Solutions Generator. (not available in WSPBuilder)
Cons:
1) Performance issue and not very stable. While developing I used to get lot of errors.
2) Does not follow 12 Hive structure.
3) While deploying solutions, we may get this error: No language-neutral solution exists in the store.
4) VSeWSS 1.3 has issues when you deploy WSP packages.
For more information on comparisons between VSeWSS and WSPBuilder follows these links:
>> Solution package development tool comparisons
>> SharePoint Development Tools
In this post, I will move SharePoint soltions from VSeWSS 1.2 to WSPBuilder. Apparently, Migration from VSeWSS to WSPBuilder is easy but there are some little tricks, you face some bugs and other workarounds to get the solutions working.
I am going to create a VSeWSS 1.2 project which will do the following:
1) Create a new custom field control and do some kind of validations using regular expressions.
2) Create a custom content type using those field control.
3) Create a List Definition from that content type.
Its a screen cast from channel 9.
NOTE: I had really tough time using VSeWSS 1.3 extensions and there were lot of issues. I finally reverted back to 1.2.
So, Lets get started:
Download the source
PartA. Create a VSeWSS 1.2 project.
---------------------------------------------------------------------------------------------------
Step1: Open up Visual Studio >> File >> New >> Project >> From "Project Types" select "SharePoint" and from "Templates" select "Empty".

Step2: Right click on the project >> Add >> New Item >> List Instance and name it "Videos"

>> Choose the base type. Select the "Links".

>> Open up the instance.xml, modify the "Title", "OnQuickLaunch" and some default rows in data elements.
<ListInstance FeatureId="00bfea71-2062-426c-90bf-714c59600103"
Title="Videos"
Description="links to the videos"
OnQuickLaunch="TRUE"
Url="Lists/Videos">
<Data>
<Rows>
<Row>
<Field Name="URL">http://www.yahoo.com</Field>
<Field Name="Comments">Link to yahoo website</Field>
</Row>
<Row>
<Field Name="URL">http://www.google.com</Field>
<Field Name="Comments">Link to google website</Field>
</Row>
</Rows>
</Data>
</ListInstance>
>> Right click on the project >> Add >> New Item >> Field Control

Why to do need this is because our field is going to have a specific formatting requirements i.e. some kind of validations must be applied on that field.
Step3: Open up "TimeCode.Field.cs"
We have time span field which has format: "HH:MM:SS.MMMMMMM". We can follow same formatting requirements.
----------------------------------------------------------------------
public override string GetValidatedString(object value)
{
string input = value.ToString();
if (this.Required && string.IsNullOrEmpty(input))
{
throw new SPFieldValidationException("This field is required!");
}
Regex r = new Regex(@"^\d{2}:\d{2}:\d{2}\.\d{7}$");
if (!r.IsMatch(input))
{
throw new SPFieldValidationException("Time code must be in the format of HH:MM:SS.MMMMMMM");
}
return base.GetValidatedString(value);
}
-------------------------------------------------------------------------------------------
Project structure will be like this:

Step4: Create a content type.
>> Right click on project >> Add >> New Item >> Content type

>> Choose the "Item" from the "Base Content Type"

>> We can see some commented "Fields" and "FieldRef"

>> Uncomment this field. Add 2 more fields namely "URL" and "TimeCodeField"
>> i) "URL" field "ID" is already defined in 12 >> Template >> Features >> Fields >> fieldswss.xml

ii) "TimeCode" field is defined in TimeCode.Field.cs. "ID" is the Guid.

>> Do the same with "FieldRefs"

>> Save the project
Step5: List Definition from the Content type
>> Right click on the project >> Add >> New Item >> Choose "List Definition from the Content type"

>> It will ask for new annotation type we just created a moments ago.We check the "Create an instance for this list. " and click OK. It will create some assets for us. The first asset will be instance definition.

>> Open the "instance.xml", modify the title element "AnnotationList Instance" to "Annotations". Add other elements like "Description", "OnQuickLaunch" etc.

>> Open the next asset "schema.xml". We minimize the outlining of the elements of schema.xml so that we can seek through. Under "Metadata" we have element called as "Views". The BaseViewId="1" is the default view. If we expand that view, it defines elements called as "ViewFields". These are the columns which we will see i.e. "Attachments" and "LinkTitle". We will add 3 more "FieldRefs" in the default view namely "AnnotationID", "MediaPath" and "TimeCode".

Step6: Feature Receiver
>> Apparently, when we provision the SharePoint solution and when we try to deactivate the list, it does not clean up automatically. We will do it on this part here.

>> Add SharePoint reference. (using Microsoft.SharePoint)
>> Make the class public and inherit from SPFeatureReceiver and implement abstract classes.
>> In "FeatureDeactivating" method we clean the "Annotation" list
public override void FeatureDeactivating(SPFeatureReceiverProperties properties)
{
using (var web = properties.Feature.Parent as SPWeb)
{ if (null != web)
{
SPList list = web.Lists["Annoataions"];
if (null != list)
list.Delete();
}
}
}
>> On top of class "ListFeatureReceiver", we add one attribute [CLSCompliant(false)]
Step7: WSP View
>> Open up the feature.xml under "Videos" folder.
>> We add 2 main elements
i) ReceiverClass: "Msdn.Web.ListFeatureReceiver"
ii) ReceiverAssembly:. For this, we have to compile the solution and use "WSPBuilder" option to "Copy to GAC".
Go to C:\Windows\Assembly, locate the Msdn.Web, right click and get the "PublicKeyToken"
and copy the token in the code as follows:
ReceiverAssembly="Msdn.Web, Version=1.0.0.0, Culture = neutral, PublicKeyToken = 9f4da00116c38ec5"
>> Deploy the solution

If you followed the steps, you will be able to test the solution.


------------------------------------------------------------------------------------------
PartB: Moving VSeWSS project to WSPBuilder project.
Well, migrating the VSeWSS to WSPBuilder is easy but there are some tricks. Its because VSeWSS DOES NOT follow 12 hive structure but WSPBuilder does. There are some other tricks which I will present in following steps.
Field Control and field validations:
Step8: Open upVisual Studio >> File >> New >> Project >> WSPBuilder project. Project name: WSPFieldControl
Right click on the project >> Add >> New Item >> WSPBuilder >> Feature with receiver
ListFeatureReceiver and update the feature settings as follows:

Step9: Now, we have to follow the 12 hive structure here. In 12 hive ,we have XML folder where fieldtypes are defined. under 12 hive Therefore, we create a "XML" folder and copy "fldtypes_TimeCode.xml".
Moreover, in the "FeatureCode" folder, we copy "TimeCode.Field.cs" and "TimeCode.FieldControl.cs".
Build the solution and may get this error:
BUG1:

Just Add Reference >> Locate Microsoft.SharePoint.Security and build it again.
Build WSP >> Deploy.
>> Go to the SharePoint site >> Site Actions >> Site Settings >> Activate "Field Control".
To test of new field control is added, Go to the "Tasks" list >> List Settings >> "Create Column"
Strange! New Field control is not added.

>> The reason is that we to rename the namespace "Msdn.Web" to "WSPFieldControl" in "TimeCode.Field.cs" and "TimeCode.FieldControl.cs"

>> Deploy the solution
To test of new field control is added, Go to the "Tasks" list >> List Settings >> "Create Column" >> Choose "TimeCodeField" and hit "Ok" button.
We will get this error:

In general,
BUG2:
Field type <fieldname> is not installed properly. Go to the list settings page to delete this field.
Apparently, troubleshooting this issue took lot of time. I compared "Msdn.Web" project, and examined "fldtypes_TimeCode.xml".

I had to use the assembly, which is "WSPFieldControl, Version=1.0.0.0, Culture=neutral, PublicKeyToken=600c68ca084bfb1c""

>> Deployed the solution again and To test of new field control is added, Go to the "Tasks" list >> List Settings >> "Create Column" >> Choose "TimeCodeField" and hit "Ok" button.
Again, you will get this error.

BUG3:
The given assembly name or codebase was invalid. >> After some more research, I found besides assembly, I have to also add the class i.e.
namespace.classname, assembly name, version, culture, publickeytoken
"WSPFieldControl.TimeCodeField, WSPFieldControl, Version=1.0.0.0, Culture=neutral, PublicKeyToken=600c68ca084bfb1c"
>> Deployed the solution again and To test of new field control is added, Go to the "Tasks" list >> List Settings >> "Create Column" >> Choose "TimeCodeField" and hit "Ok" button. It will work properly this time. Phew!!
Content type
Step10: For developing the content type is quite simple. Under "ListFeatureReceiver" feature, we copy the content types in "elements.xml"

Also modify the "feature.xml" and update the scope to "Site" as content types are deployed on site level.
List definition with content types
Step11: Follow the same steps in previous blog post.
>> In "ListFeatureReceiver" feature create 3 folders "DocLib", "ListInstances", and "ListTemplates"
>> In feature.xml, get the feature ID and copy this is to ListDefinition.xml, schema.xml and ListInstances.xml.
>> a) feature.xml

b) schema.xml

c) ListTemplates.xml

d) elements.xml (List Instance)

>> Deploy the solution.
>> Go to the SharePoint site >> Site Actions >> Site Collection Feature >> Activate the feature "Field Control".

>> On the home page, we can see the "Annotations" list.

Cheers,
--Aaroh


No comments:
Post a Comment