Hi all,
Developing an application page in SharePoint is not very straightforward. In this walk through, I will demonstrate and explain step-by-step.
Please read my blog about "Application Pages" and "Site Pages"
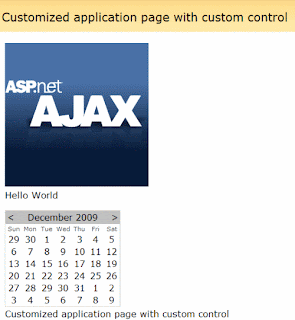
Following is a the screen shot of an customized application page:
Step1) Fire up Visual Studio.NET.
File >> New >> Project >> WSPBuilderProject >> ProjectName: WSPBuilderApplicationProject
Step2) Prepare 12 hive structure with proper folders.
>> Create a folder named "TEMPLATE"
>> Under "Template" folder,create a sub-folder named
>> "IMAGES"
>> Under "Images" folder , create a folder "ASPXAJAX"
>> Under "ASPXAJAX" create an image named "aspx_ajax.png"
>> Under "Template" folder,create a sub-folder named
>> "LAYOUTS"
>> Under "Layouts" folder , create a folder "ASPX"
>> Under "ASPX", Right click on the ASPX folder, Add new item, Select Text File and Rename the TextFile1.txt to “CustomPage.aspx”
>> Right click on the "WSPBuilderApplicationPage", Add >> Add Folder and name it to "Assembly"
>> Under "Assembly" folder, create a sub-folder names "WebControls"
>> Right click on the WebControls folder, Add new item, select class and rename Class1.cs to Control1.cs
Step3) Add a reference to System.Web.dll
>> Go to the Project menu, click Add Reference
>> Locate the "System.Web.dll"
>> Click the OK button.
Step4) Modifying the "CustomPage.aspx" page.
>> On the first line specify the MasterPageFile
<%@ Page Language="C#" MasterPageFile="~/_layouts/application.master" %>
>> Adding the content place handlers.
<%--Control Place Holder--%>
<asp:Content ID="Main" runat="server" ContentPlaceHolderID="PlaceHolderMain">
<table>
<tr>
<td>
<CustomControls:Control1 ID="control1" runat="server" />
</td>
</tr>
<tr>
<td>
<asp:Label ID="Label1" runat="server" Text="Label">Hello World</asp:Label> <br />
<br />
<asp:Calendar ID="Calendar1" runat="server" ></asp:Calendar>
</td>
</tr>
<tr>
<td align="right">
Customized application page with custom control
</td>
</tr>
</table>
</asp:Content>
>> Add site title to the browser and to the page
<%--Site Title in the Browser--%>
<asp:Content ID="PageTitle" runat="server" ContentPlaceHolderID="PlaceHolderPageTitle">
Customized application page with custom control
</asp:Content>
<%--Site Title in the Page --%>
<asp:Content ID="PageTitleInTitleArea" runat="server" ContentPlaceHolderID="PlaceHolderPageTitleInTitleArea">
Customized application page with custom control
</asp:Content>
Step5) Modifying the "Control1.cs" class.
>> Add these "using" statements.
using System;
using System.Collections.Generic;
using System.Text;
using System.Web.UI.WebControls;
using System.Web.UI;
using System.Web;
using System.Collections.Generic;
using System.Text;
using System.Web.UI.WebControls;
using System.Web.UI;
using System.Web;
>> . Override the "CreateChildControls" method with this code:
namespace WSPBuilderApplicationPage.WebControls
{
public class Control1 : System.Web.UI.WebControls.WebControl
{
protected override void CreateChildControls()
{
base.CreateChildControls();
Image imgButton = new Image();
imgButton.ImageUrl = "/_layouts/images/ASPXAJAX/asp-net-ajax.png";
imgButton.ToolTip = "ASPXAJAX";
imgButton.Attributes.Add("OnClick", "location.href('http://testserver/sites/apac/default.aspx')");
imgButton.Attributes.Add("style", "cursor: hand;");
this.Controls.Add(imgButton);
}
}
}
{
public class Control1 : System.Web.UI.WebControls.WebControl
{
protected override void CreateChildControls()
{
base.CreateChildControls();
Image imgButton = new Image();
imgButton.ImageUrl = "/_layouts/images/ASPXAJAX/asp-net-ajax.png";
imgButton.ToolTip = "ASPXAJAX";
imgButton.Attributes.Add("OnClick", "location.href('http://testserver/sites/apac/default.aspx')");
imgButton.Attributes.Add("style", "cursor: hand;");
this.Controls.Add(imgButton);
}
}
}
Step6 ) Deploying the WSP solution.
>> Build the solution and check if there is any error.
>> Right click on the "WSPBuilder" menu >> Build WSP >> Deploy.
>> Also on the menu select "Copy to GAC".
>> Get the assembly information from the GAC which is located at C:\Windows\assembly
>> Add the assembly information to the "CustomPage.aspx", just below the
CustomPage.aspx (Full code)
----------------------------------------------------------------------------------------------------------------
<%@ Page Language="C#" MasterPageFile="~/_layouts/application.master" %> i.e.
<%@ Register TagPrefix="CustomControls" Namespace="ApplicationPageWithCustomControl.WebControls"
Assembly="ApplicationPageWithCustomControl, Version=1.0.0.0, Culture=neutral, PublicKeyToken=6b80c524e7fdd639" %>
Assembly="ApplicationPageWithCustomControl, Version=1.0.0.0, Culture=neutral, PublicKeyToken=6b80c524e7fdd639" %>
<%--Control Place Holder--%>
<asp:Content ID="Main" runat="server" ContentPlaceHolderID="PlaceHolderMain">
<table>
<tr>
<td>
<CustomControls:Control1 ID="control1" runat="server" />
</td>
</tr>
<tr>
<td>
<asp:Label ID="Label1" runat="server" Text="Label">Hello World</asp:Label> <br />
<br />
<asp:Calendar ID="Calendar1" runat="server" ></asp:Calendar>
</td>
</tr>
<tr>
<td align="right">
Customized application page with custom control
</td>
</tr>
</table>
</asp:Content>
<asp:Content ID="Main" runat="server" ContentPlaceHolderID="PlaceHolderMain">
<table>
<tr>
<td>
<CustomControls:Control1 ID="control1" runat="server" />
</td>
</tr>
<tr>
<td>
<asp:Label ID="Label1" runat="server" Text="Label">Hello World</asp:Label> <br />
<br />
<asp:Calendar ID="Calendar1" runat="server" ></asp:Calendar>
</td>
</tr>
<tr>
<td align="right">
Customized application page with custom control
</td>
</tr>
</table>
</asp:Content>
<%--Site Title in the Browser--%>
<asp:Content ID="PageTitle" runat="server" ContentPlaceHolderID="PlaceHolderPageTitle">
Customized application page with custom control
</asp:Content>
<%--Site Title in the Page --%>
<asp:Content ID="PageTitleInTitleArea" runat="server" ContentPlaceHolderID="PlaceHolderPageTitleInTitleArea">
Customized application page with custom control
</asp:Content>
<asp:Content ID="PageTitle" runat="server" ContentPlaceHolderID="PlaceHolderPageTitle">
Customized application page with custom control
</asp:Content>
<%--Site Title in the Page --%>
<asp:Content ID="PageTitleInTitleArea" runat="server" ContentPlaceHolderID="PlaceHolderPageTitleInTitleArea">
Customized application page with custom control
</asp:Content>
------------------------------------END OF CustomPage.aspx ------------------------------
Control1.cs (Full code)
----------------------------------------------------------------------------------------------------
using System;
using System.Collections.Generic;
using System.Text;
using System.Web.UI.WebControls;
using System.Web.UI;
using System.Web;
using System.Collections.Generic;
using System.Text;
using System.Web.UI.WebControls;
using System.Web.UI;
using System.Web;
namespace WSPBuilderApplicationPage.WebControls
{
public class Control1 : System.Web.UI.WebControls.WebControl
{
protected override void CreateChildControls()
{
base.CreateChildControls();
Image imgButton = new Image();
imgButton.ImageUrl = "/_layouts/images/ASPXAJAX/asp-net-ajax.png";
imgButton.ToolTip = "ASPXAJAX";
imgButton.Attributes.Add("OnClick", "location.href('http://testserver/sites/apac/default.aspx')");
imgButton.Attributes.Add("style", "cursor: hand;");
this.Controls.Add(imgButton);
}
}
}
{
public class Control1 : System.Web.UI.WebControls.WebControl
{
protected override void CreateChildControls()
{
base.CreateChildControls();
Image imgButton = new Image();
imgButton.ImageUrl = "/_layouts/images/ASPXAJAX/asp-net-ajax.png";
imgButton.ToolTip = "ASPXAJAX";
imgButton.Attributes.Add("OnClick", "location.href('http://testserver/sites/apac/default.aspx')");
imgButton.Attributes.Add("style", "cursor: hand;");
this.Controls.Add(imgButton);
}
}
}
----------------------END OF Control1.cs-----------------------------------------------------------
>> Deploy the solution again by hitting the "Upgrade" option of the "WSPBuilder".
Step7) On the "Central Administration ", go to "Operations" >> "Solution Management" and check if our solution is successfully deployed on the farm.
To test our customized application page, go to:
http://TestServer/_layouts/aspx/CustomPage.aspx
Cheers,
--aaroh


No comments:
Post a Comment