Hi All,
I am working on PowerApps for couple of days and
specifically for SharePoint Online. I have worked with other 3rd
party Forms and Workflows for more than a year. But learning new tools and
techniques are always beneficial for customers who do not want to shell out a
fortune for 3rd party apps or have lower budget for designing
business applications.
So why you care for PowerApps?
In short, it turns your business solutions with ease, and business SOFTWARE need NOT to be hard. We can work anywhere, anytime and on any device. Furthermore, there is no business app that is “complete”. Thus, customer have only two options either BUY or BUILD.
But what about we EXTEND the stuff that we ALREADY use? A lot of custom solutions by partners are around Microsoft applications such as Excel, Visual Basic, Access, SharePoint, InfoPath to fill the gap. But it poses a big challenge and they are
·
Not Cloud-first.
·
Not addressable for multiple devices i.e. cross-platform
·
Not CONNECTED
to our other data sources.
·
Not Centrally
manageable.
·
At end, we need to engage a developer to write custom code.
PowerApps addresses these challenges. Below are the benefits
1.
Easy
Authoring
Provides a truly WYSIWYG designer with complete control over user experience.
Creates app logic with familiar Excel-like expressions.
Mash up data from multiple sources right at the app level.
Provides a truly WYSIWYG designer with complete control over user experience.
Creates app logic with familiar Excel-like expressions.
Mash up data from multiple sources right at the app level.
2. Connected
Common data service (CDS) provides a rich platform and standard model that gets creators instantly productive.
CDC connects to Dynamics 365, Office 365, Flow, Power BI natively and many connectors/gateways. We have option development extensibility as well.

Add custom connectors and on-premises sources.

3.
Cross
Platform
We can publish apps instantly iOS, Android,Windows, and the web.
Sharing apps is like sharing documents.
Manage across environments.

We can publish apps instantly iOS, Android,Windows, and the web.
Sharing apps is like sharing documents.
Manage across environments.

4.
Enterprise
Ready
Centrally view app telemetry and manage apps
Able to set DLP policy on data and connectors.
Compliance with 13+ standards including HIPAA, EU Model Clauses and SOC
Centrally view app telemetry and manage apps
Able to set DLP policy on data and connectors.
Compliance with 13+ standards including HIPAA, EU Model Clauses and SOC

5.
Pro
Developers and integration
Build apps that go beyond that you get in the box.
Build reusable custom app components and connectors.
Leverage full power of azure capabilities.

Build apps that go beyond that you get in the box.
Build reusable custom app components and connectors.
Leverage full power of azure capabilities.

Eventually, we get highly
scalable platform. If the problem gets more complex, solution gets more
complex, we don’t need to reach to developer.


This blog post is about a typical custom app for Expense Claim and data source is SharePoint Online. We could have different flavors such as vacation requests, travel requests or sales order-line items etc.
We will see the topics such as Gallery, Forms, DataTable, conditional formatting, and REPEATING DATA ENTRIES
Developing PowerApps
for SharePoint
We can customize PowerApps leveraging two options:
a) SharePoint list embedded forms
Recently (Q4 2017) PowerApps team has added customization forms option in the SharePoint List as follow:

When you create an item, you can customize form

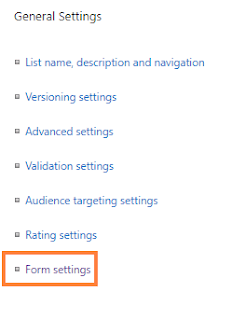
You can also navigate to List Settings >> Form Settings

>> It has to be noted that at this point of time (31 Dec 2017), there is NO mobile PowerApps available via SharePoint customized form.
>> You cannot import / export SharePoint customized forms from one environment to another.
So, you have to create a separate custom app for mobile phone via Create an app option for the mobile phone.
Embedded forms are special kind of PowerApps and its directly tied to the SharePoint list. PowerApps Controls have simple types such as buttons, drop down, date picker etc. and also have complex types such as choice, people picker, lookups etc.
b) Create an app
In this option, you can create a custom PowerApps app and can be used for mobile devices. In this example, we will create a PowerApps desktop client to build this Expense claim form.
During developing the PowerApps desktop client, I found that its much slower its browsers based counterpart (https://web.powerapps.com/ )
a) SharePoint list embedded forms
Recently (Q4 2017) PowerApps team has added customization forms option in the SharePoint List as follow:

When you create an item, you can customize form

You can also navigate to List Settings >> Form Settings


>> It has to be noted that at this point of time (31 Dec 2017), there is NO mobile PowerApps available via SharePoint customized form.
>> You cannot import / export SharePoint customized forms from one environment to another.
So, you have to create a separate custom app for mobile phone via Create an app option for the mobile phone.
Embedded forms are special kind of PowerApps and its directly tied to the SharePoint list. PowerApps Controls have simple types such as buttons, drop down, date picker etc. and also have complex types such as choice, people picker, lookups etc.
b) Create an app
In this option, you can create a custom PowerApps app and can be used for mobile devices. In this example, we will create a PowerApps desktop client to build this Expense claim form.
During developing the PowerApps desktop client, I found that its much slower its browsers based counterpart (https://web.powerapps.com/ )
DATA STRUCTURE FOR THE SOLUTION
We will have two
custom lists.
i) One list will record all the Expense items such as Purpose, Amount, Start and End date, Approver etc.

ii) Second list will have Expense Details with Expense title as a lookup field

Develop Expense Claim App via PowerApps Desktop client.
i) One list will record all the Expense items such as Purpose, Amount, Start and End date, Approver etc.

ii) Second list will have Expense Details with Expense title as a lookup field

Develop Expense Claim App via PowerApps Desktop client.
·
Create a New
>> Tablet Layout via PowerApps
Desktop client


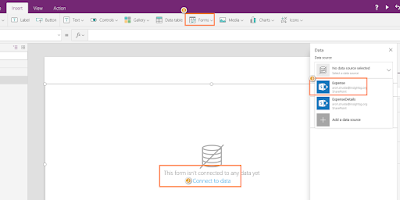
·
On the PowerApps designing canvas, click on the connect to data. New Data
panel will show up. Click on “New
connection” and choose your data
source. In our example, its SharePoint Online. Select your Microsoft/Office 365 account.


·
You need to specific SharePoint URL:
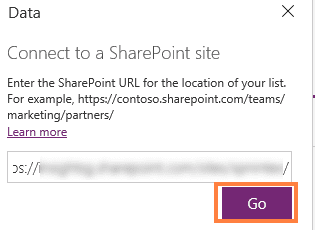

·
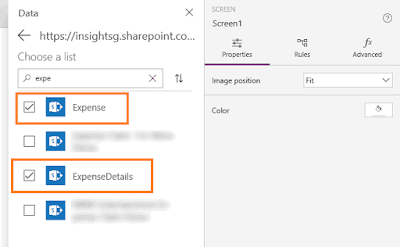
You can search and select for Expense lists and click on Connect

·
Now, both the lists are connected to our data
source. You can have as many lists in the solution.


·
Blank
vertical from Gallery

Gallery control is PowerApps control that helps in editing the template, shows multiple records of data source and each record can contain multiple controls.
Gallery control is PowerApps control that helps in editing the template, shows multiple records of data source and each record can contain multiple controls.
·
Name
and Save the app


·
Create a rectangle
(Icons) from the insert ribbon.


·
Drag and drop label on the rectangle and color the label white.


·
Connect the data, select the Expense list

As layout is Blank, we can choose “Title, subtitle, and body”
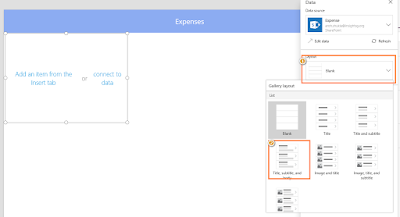

As layout is Blank, we can choose “Title, subtitle, and body”
·
Gallery
throws a bunch of defaults. We can
easily choose correct values from
the Expense list which we can change easily:

·
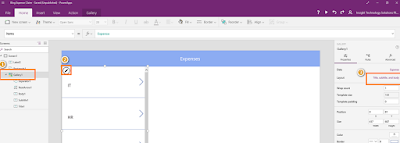
Click on Gallery
and you can view the Pencil icon.
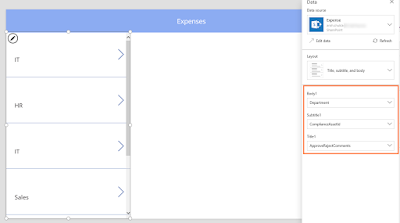
Under layout, you can alter which field you like to display:

·
We make title
as first entry in our form:
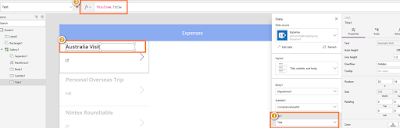

·
In the Body
section we want to display “ApprovalStatus”
which is part of Expense list. But, in the PowerApps, you can’t see the Approval Status. The reason is that
Approval Status is a choice field
and a complex type in the context of
PowerApps.

So, we have to manually type formula use Value as shown below


So, we have to manually type formula use Value as shown below

·
We can also append $ value, the same as we did in excel.


·
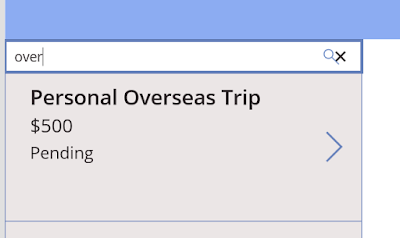
We can perform a search by applying filter
for our Expense list and bind to our gallery control. To do so, we create text box, add search icon and in the formula, add this formula to our gallery

Note: Please always give meaningful and descriptive name of the PowerApps controls.

Note: Please always give meaningful and descriptive name of the PowerApps controls.
·
Let’s Preview our search by clicking on “Play” icon

and our search results are coming through nicely.
ADDING DATATABLE TO POWERAPPS

and our search results are coming through nicely.

ADDING DATATABLE TO POWERAPPS
·
DataTable
Control
Shows data set information in a tabular view. You customize column width, header text, color. Currently it has read only view.
Click on the Data table from Insert tab. The Data table will display Data panel as well.

Shows data set information in a tabular view. You customize column width, header text, color. Currently it has read only view.
Click on the Data table from Insert tab. The Data table will display Data panel as well.

·
From the Data
panel, select the Expense Details
list


·
Select the fields
that you want to display in the DataTable.

All the selected columns are now available in our DataTable
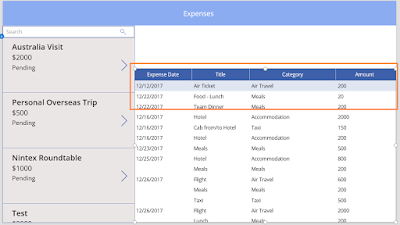
However, we are getting all the entries from Expense Details in this DataTable.
Now, we need to filter only for specific entries from the Expense list only such as Australia Visit, Personal Overseas Trip etc.
To achieve this, we need to follow steps
·
Click on “>”
and set the Visible property to ThisItem.IsSelected


·
Click on the “ExpenseDetailsDataTable1” and apply following filter Filter(ExpenseDetails, ExpenseDetails.Value
= ExpenseGallery1.Selected.Title)

Now, we are able to get each expense item expense individually from the Expense Details list.
We have completed master details scenarios.

Now, we are able to get each expense item expense individually from the Expense Details list.
We have completed master details scenarios.
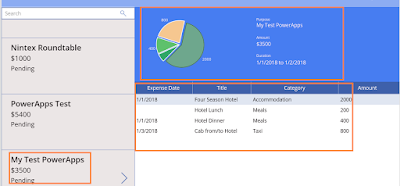
·
We will add a pie chart for each expense item. Copy and Paste rectangle and change the background


·
Pie Chart shows some sample data. We can attach
our Expense information to this pie chart. Click on the “ExpensePieChart” and in the
formula bar set this value ShowColumns(ExpenseDetails, "Category",
"Amount")
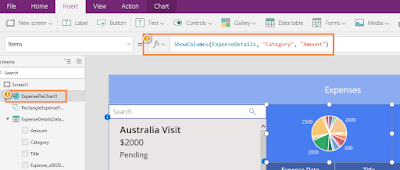
But this pie chart shows all the expense for each expense item. We need to filter for each expense item for pie chart.

But this pie chart shows all the expense for each expense item. We need to filter for each expense item for pie chart.
·
For “ExpenseDetailsDataTable”
copy the formula Filter(ExpenseDetails,
ExpenseDetails.Value = ExpenseGallery1.Selected.Title) and place to our pie chart ShowColumns(Filter(ExpenseDetails, ExpenseDetails.Value =
ExpenseGallery1.Selected.Title), "Category", "Amount")

Let’s Preview this

It’s pretty fast and snappy.

Let’s Preview this

It’s pretty fast and snappy.
·
We can add
some labels near pie chart.


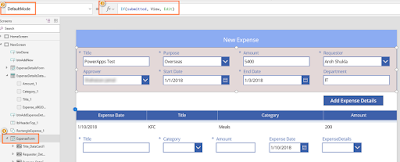
ADDING FORM TO POWERAPPS


ADDING FORM TO POWERAPPS
·
View, Edit, Create new record for a Data Source.
The type is set using FormMode. Item
property shows the specific record of the data source. Magic happens when you
set Form.Item = Gallery.Selected
·
We rename our first screen to HomeScreen and add a PLUS icon 

·
Next, we add a new screen by clicking on New Screen and choose blank screen
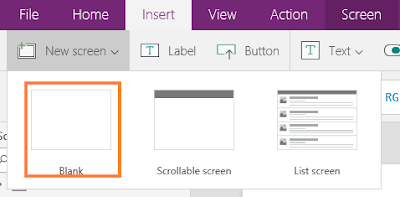
name it to NewScreen

name it to NewScreen

·
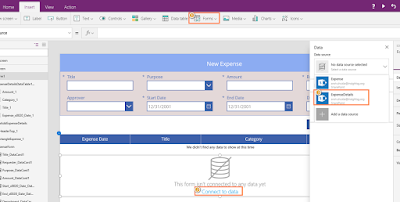
From Insert
tab go to Forms >> Edit Form
option and from the Data panel
select the Expense list.

·
Check ONLY necessary columns from the Expense list.


·
Rearrange the columns by choosing 4 layouts by
checking Snap to columns


·
Copy the Rectangle that we create in HomeScreen and paste to NewScreen and change label to New Expense.


·
Next, we
add a button “Add New Expense”
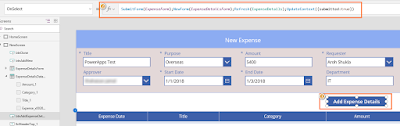
button, and form should submit in the Formula bar: SubmitForm(ExpenseForm)


·
Navigate to the HomeScreen, click on the +
icon and in the formula bar add these functions:
Navigate(NewScreen,ScreenTransition.Fade);NewForm(ExpenseForm)
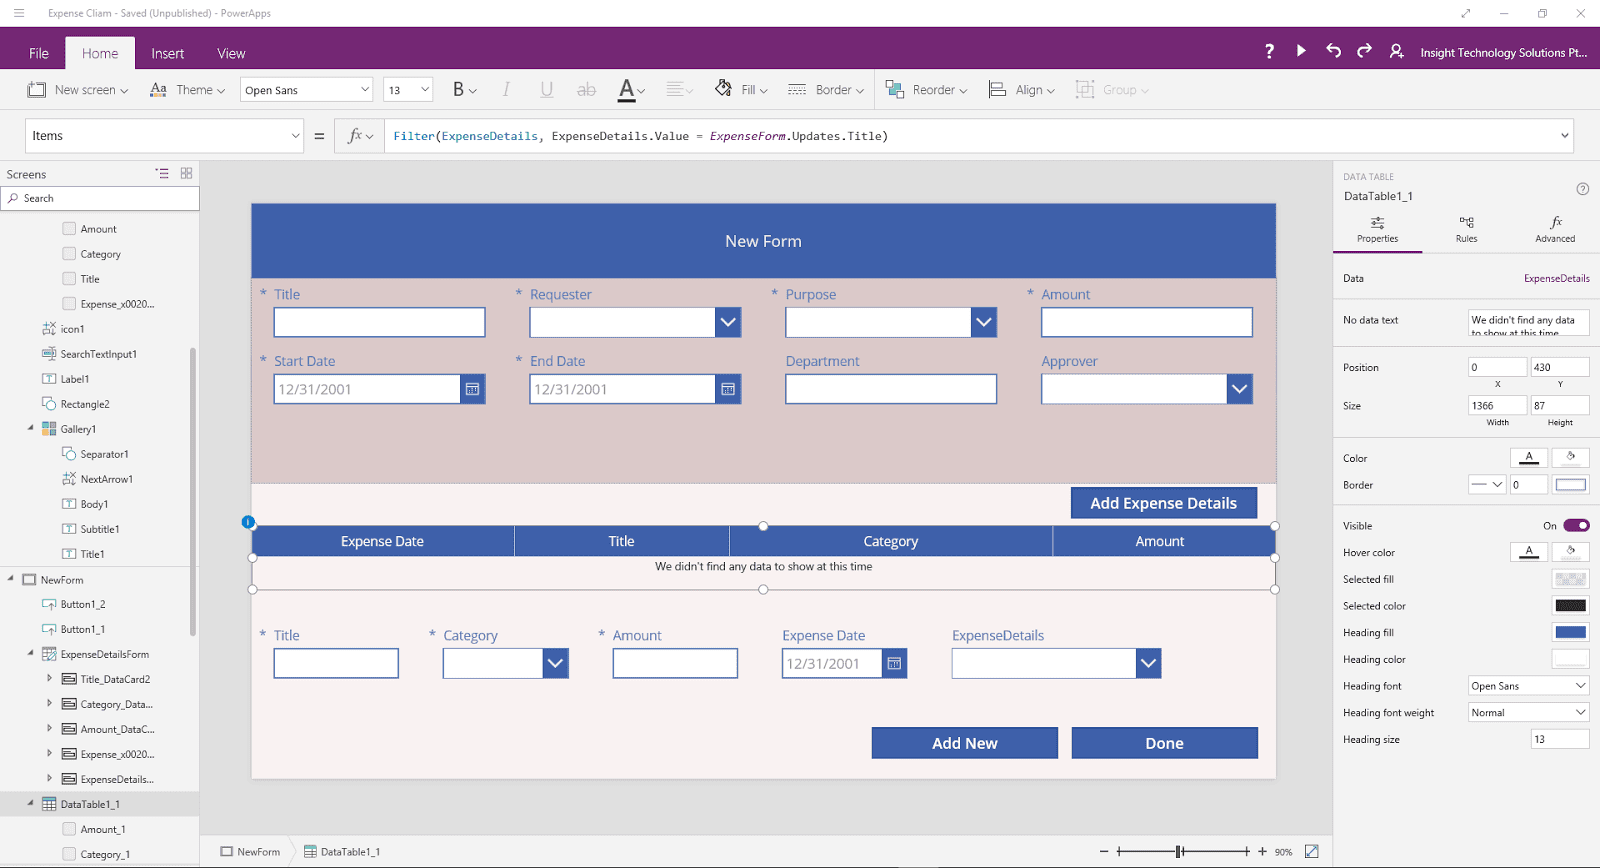
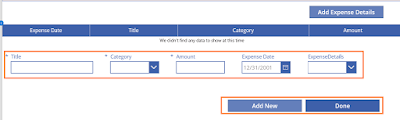
ADDING REPEATING SECTION FOR EXPENSE
FORM

·
In new form, we should be adding multiple entries for user to fill in. This Expense
information will be captured in the Expense
Details list.
We add a DataTable to achieve that. We already created a DataTable in the HomeScreen. So, we can simply copy and paste that DataTable to our ExpenseForm in the New Screen.

But this the old formula which we copied from HomeScreen DataTable. We need to fill other formula as shown:

We add a DataTable to achieve that. We already created a DataTable in the HomeScreen. So, we can simply copy and paste that DataTable to our ExpenseForm in the New Screen.

But this the old formula which we copied from HomeScreen DataTable. We need to fill other formula as shown:

·
Add more Edit
Form below our DataTable and bind to Expense
Details list

Bind only necessary columns that needs to be displayed.
·
Copy and Paste “Add New Details” below Edit
Form. Name the buttons “Add New”
and “Done”

·
For the Add
New button, we will add following
formulas

Refresh function gets the latest copy of the data source.

Refresh function gets the latest copy of the data source.
·
For the Add
Expense Details, we will add
following formulas


·
For the Done
button, we will simply navigate to the HomeScreen


·
Verify if user has submitted the New Screen


·
Verify if the form is Edit mode or View mode

·
Test
the App
Add new expense by clicking “+” icon and append multiple entries as shown:

We can view the entry at Home Screen.


I hope this blog post helped.
References:
Add new expense by clicking “+” icon and append multiple entries as shown:

We can view the entry at Home Screen.

·
CONDITIONAL
FORMATTING
·
We can use Color
property to control the text color control and use Fill property for fill color.
We can also set one or more conditions based on
state of the app or control or variable. 

I hope this blog post helped.
References:


No comments:
Post a Comment